Monday, November 14, 2022

BIRTHDAY BLITZ!

We consider November 13th to be the 'kick-off' to the holiday season. It is my husband Jerry's birthday and I like to indulge him in lots of treats. This year's birthday dinner was...

SALMON TERIYAKI

This Teriyaki Sauce is good on so many different things. Sunday was Jerry's actual birthday, but we did the big birthday dinner Saturday night. On Sunday I made a bunch of game-day snacks to accompany our day of watching football. I glazed Rumaki's with the Teriyaki Sauce, which was really delicious (if you like chicken liver!), but that's for another blog. Here's how I made the Sauce...

Ingredients:
3 Tbsp. Teriyaki Sauce
3 Tbsp. Hoisin Sauce
3 Tbsp. Soy Sauce
1 Tbsp. white vinegar
1 Tbsp. Sesame Oil
1/3 cup packed brown sugar
2 large garlic cloves, finely minced
2 tsp. freshly grated ginger root

Sesame seeds and thinly sliced green part of scallion to serve.

I made this sauce in the morning and let it sit all day. 

Preparation:
Combine all ingredients and gently heat to dissolve the brown sugar. That's it! Done!

Generously coat both sides of salmon with the Teriyaki Sauce and marinate for about 1 hour. Heat oven to 400 degrees. Remove salmon from marinade and place on a foil lined baking sheet. Bake salmon for about 15 minutes. Cooking time will depend on the thickness of your salmon. It should be flakey, but not dry. While salmon is baking, re-heat the Teriyaki Sauce. To serve, brush the salmon with additional sauce and top with sesame seeds and sliced scallion tops. Sweet, salty, very flavorful!

Every year for his birthday I make an ice cream of his choice. Lately he's been on a Sweetened Condensed Milk kick. He has it every morning in his coffee, so he requested...

COOKIES AND CREAM ICE CREAM
I found this recipe online, just to make sure I had the proportions correct. It is, by far, the easiest ice cream I have ever made, and possibly the best! No ice cream maker necessary.

Ingredients:
2 cups heavy whipping cream
1 14 oz. can sweetened condensed milk
1 Tbsp. vanilla
About 8 Oreo cookies, roughly chopped

I made half Cookies and Cream and half plain Sweetened Condensed Milk Vanilla Ice Cream. Use more Oreos if you're making the whole batch with cookies. This ice cream would also be excellent with fresh berries mixed throughout; chocolate syrup; peanut butter with peanut butter chips. Possibilities are nearly endless!

Preparation:
Place the whipping cream in a large bowl and beat using a mixer until soft peaks are formed. 
Fold in the sweetened condensed milk and vanilla. Gently stir until the condensed milk is absorbed. Transfer to a freezer safe container. Stir in the chopped Oreos. Place in the freezer for at least 6 hours to allow the ice cream to set. Remove from freezer about 10 minutes before servicing. Can you believe how easy that is?!

THE NEXT MORNING...

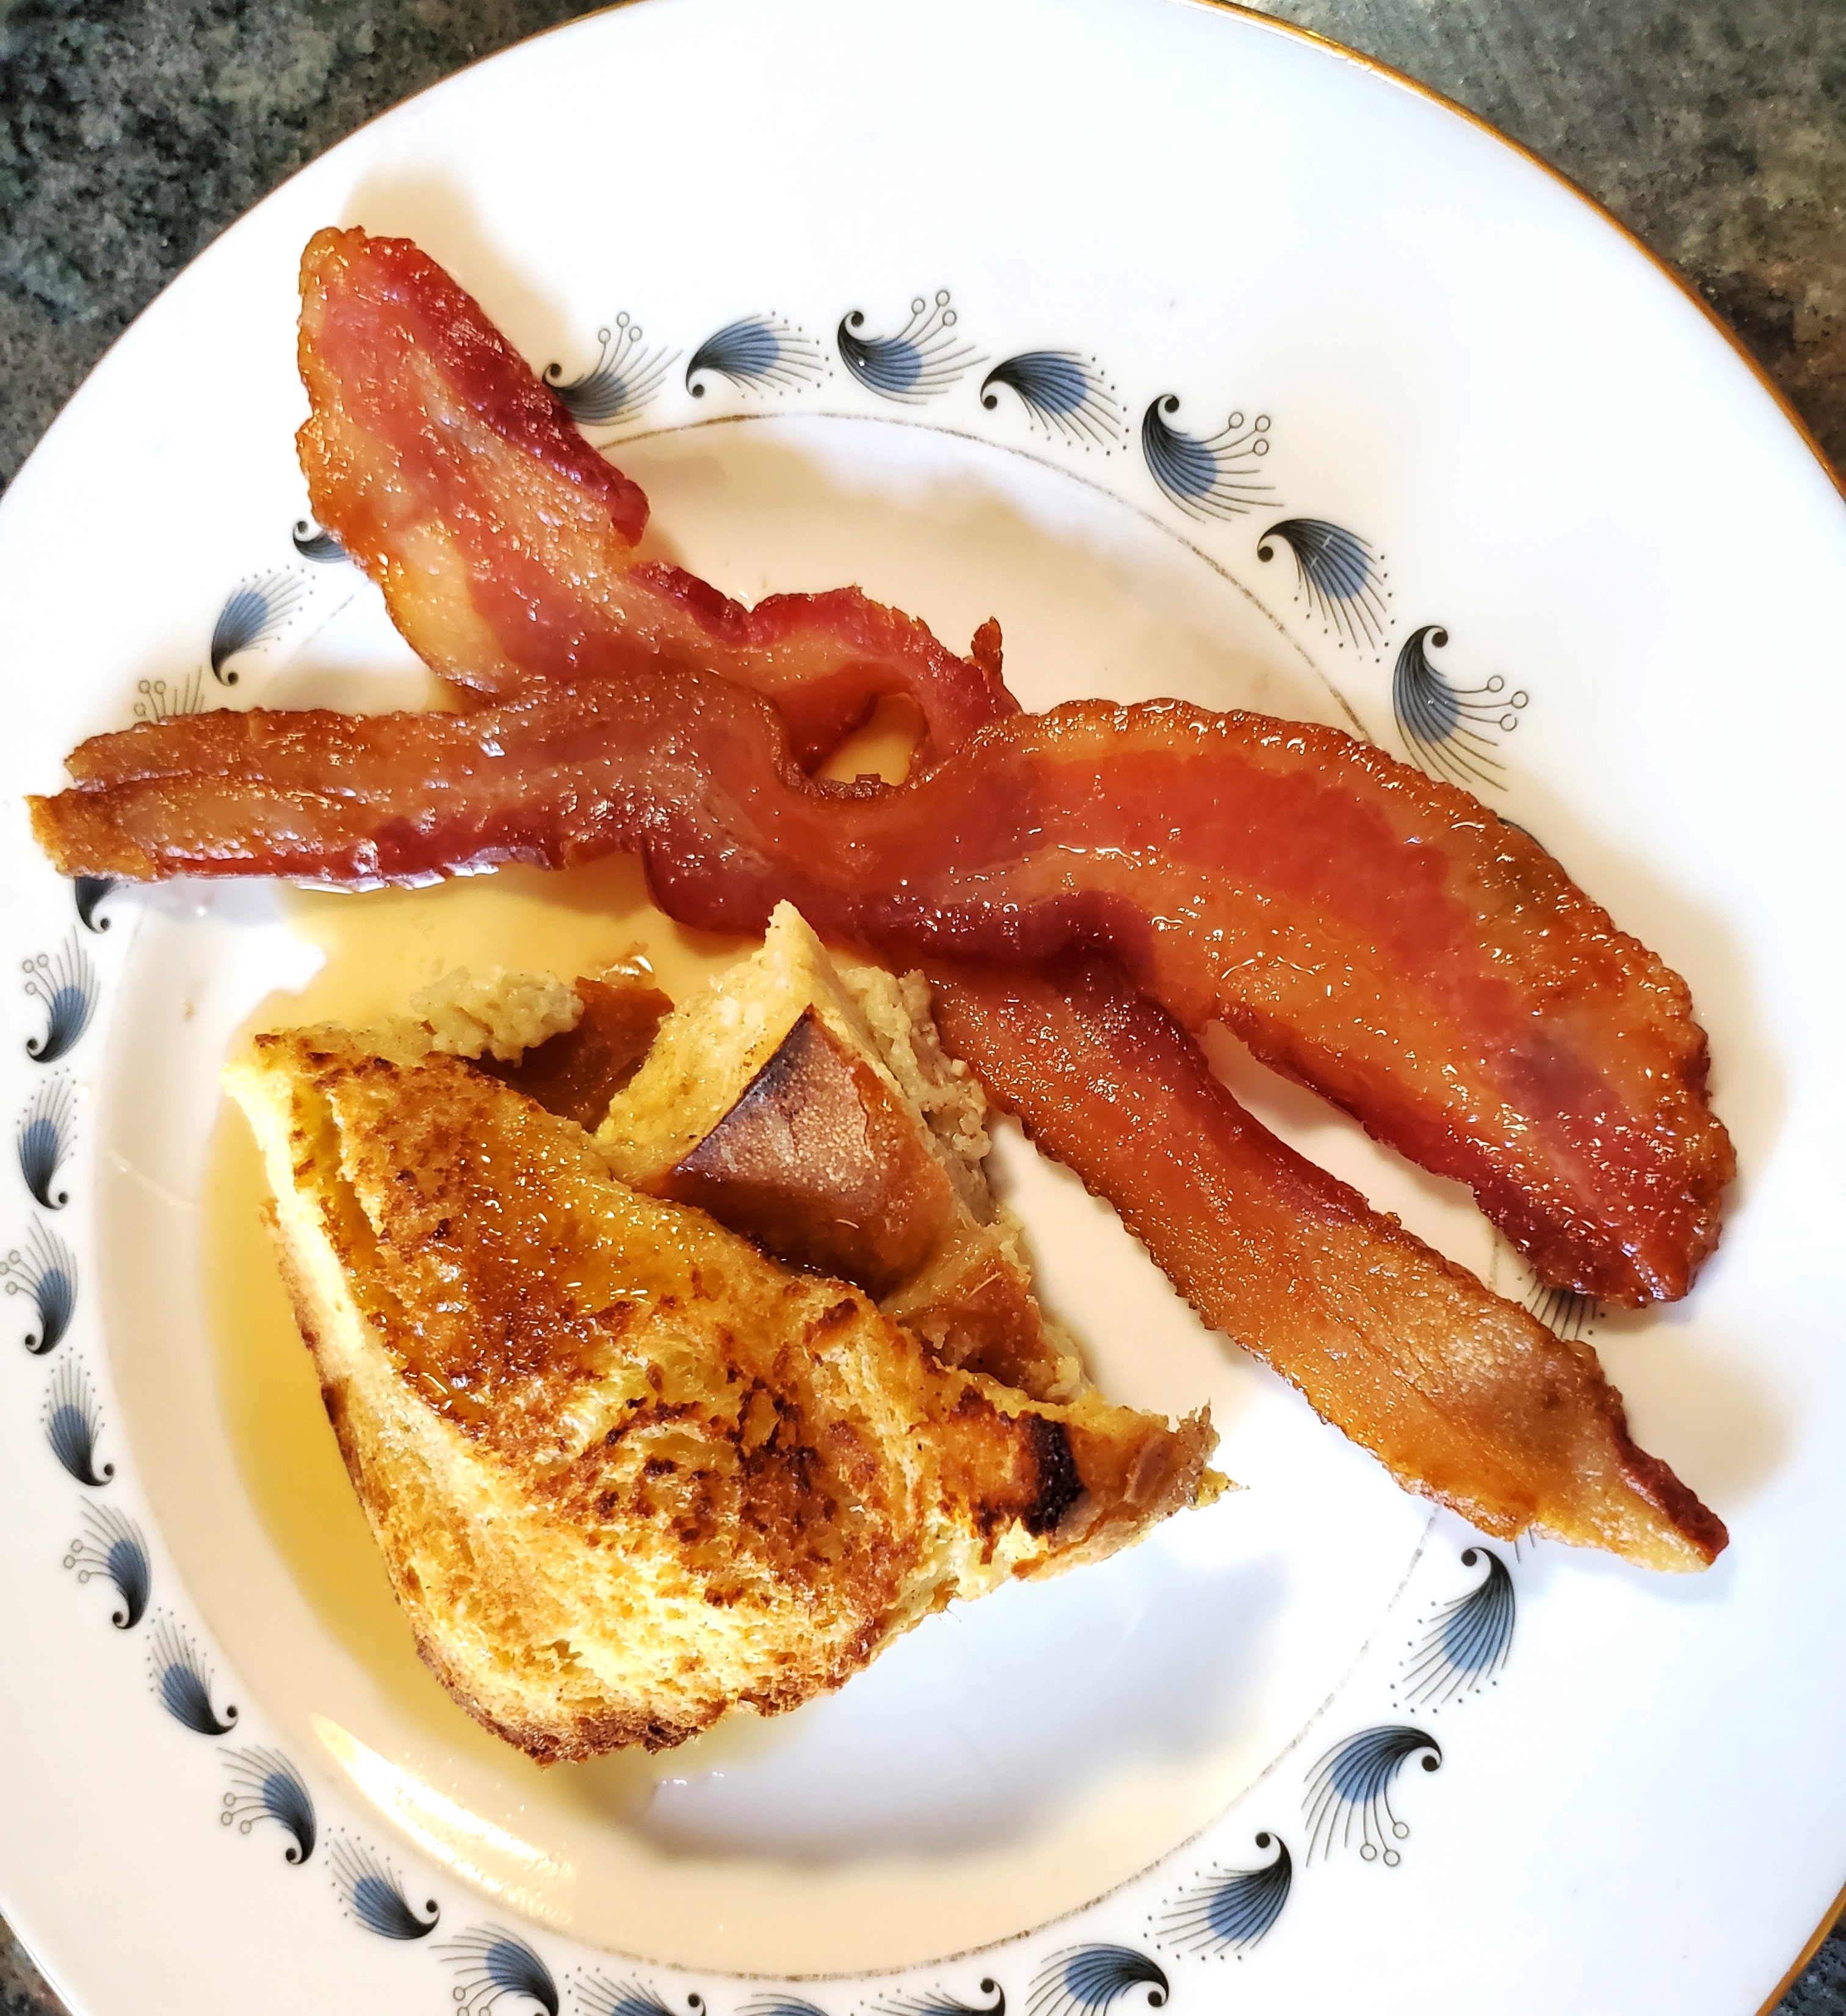
For breakfast I made OVERNIGHT YANKEE FRENCH TOAST. This is the special breakfast my Mom made for every Thanksgiving and Christmas morning. The contrast of the pudding like texture with crispy top is fabulous. It's very sweet, but bacon helps to cut that. This is nearly my Mom's recipe, but I bulked up on the spice. And so nice, especially on the holiday, to have breakfast all ready to pop in the oven since you make this the night before. 
I made my Mom's plain old white bread recipe to make the Yankee French Toast. My Mother made bread often and this recipe is simple, but delicious. Go to my home page and put White Bread in the search bar if you'd like the recipe. 

Ingredients:
4 1" thick slices white bread, cut in half on the diagonal
6 eggs
1 1/2 cups milk
1/3 cup sugar
1 Tbsp. vanilla
1/2 tsp. nutmeg
1/4 tsp. cardamon
1/2 tsp. cinnamon
1/4 tsp. salt
2 Tbsp. softened butter
Drizzle of maple syrup over the top. 

Preparation:
Generously butter bottom and sides of glass baking dish. Butter one side of the bread and place in pan butter side up. 
Beat eggs, add milk and all spices and pour mixture over the bread. Drizzle with maple syrup. Cover and refrigerate overnight.
Remove from fridge and let site on the counter for 15 minutes.
Preheat oven to 350 and bake uncovered for 45 minutes or until custard sets. Place under the broiler for 2 minutes to crisp the top. 

I CAN'T BELIEVE THANKSGIVING IS TWO WEEKS AWAY! 

I'M STILL WORKING ON MY MENU, BUT KNOW FOR SURE 
IT WILL INCLUDE TURKEY!

TUNE IN AGAIN SOON FOR ANOTHER EPISODE OF...

www.cookwithcindy.com


Saturday, October 29, 2022

TRULY GRUESOME!

BLOODY WITCHES FINGERS

I made these SAVORY, SPICY, WITCHES FINGERS for my card group. We all dressed in costumes and everyone brought perfect food for Halloween. I went as a gypsy in honor of my Hungarian heritage. It was a silly, joyous, fun-filled afternoon of eating, imbibing, and canasta playing! I am fortunate to have such wonderful lady friends. 
I found this recipe online, but amped up the spice. The consensus was they could have been even spicier, so depending on your taste, increase the heat!

Ingredients:
1 lb. sharp cheddar cheese, grated
2 cups all-purpose flour
8 Tbsp. (1 stick) butter, cut into pieces, place in freezer until ready to blend
1/2 tsp. sea salt
1 tsp. smoked paprika
1/2 tsp. cayenne pepper 
3/4 tsp. garlic powder
1 cup ice water, but you will not need all of it

Equal amounts Worcestershire sauce and Tabasco for glazing

Enough whole smoked almonds to serve as finger nails. I made only 18 fingers, but they were quite large. 

Preparation:
Put the grated cheddar cheese, flour, butter, salt, smoked paprika, cayenne, and garlic powder in a food processor. Pulse until the mixture resembles sand. Add the ice water 1 Tbsp. at a time until the dough comes together. You do not want soggy dough, but it needs to come together as a pliable ball of dough. Form the dough into a ball and wrap in plastic wrap. Place in fridge for 1 hour.

Preheat oven to 375 degrees F. Line a baking sheet with parchment paper. Using a rolling pin, gently roll out dough to about a 1 inch thickness. Cut the dough into strips the size of a finger and using your hands roll them into cylindrical finger shape. Place onto the lined baking sheet and push the smoked almonds into one end to resemble finger nails. Score the fingers to create the wrinkle lines of a finger. Brush with the Worcestershire Tabasco mixture and let the fingers cool another 30 minutes in the fridge. 
Bake for 20-25 minutes until the fingers are golden brown. Let cool for a few minutes before transferring to a rack to cool completely. 

AND HERE'S THE BLOOD...

I found this FAKE BLOOD recipe on Epicurious. It made about 1 cup, which was way more blood than I needed, as I only wanted blood splatter. Did you know that each persons blood color is unique. We all have different shades of blood red!

Ingredients:
3/4 cup light corn syrup
1/4 cup warm water
1/2 tsp. red food coloring
5 drops blue food coloring
2 drops green food coloring
1 Tbsp. corn starch

This photo is from the Epicurious site.
It looks very real. 
Preparation:
In a small bowl, whisk together the corn syrup and water. Add the red, blue, and green food colorings and whisk until well combined. Whisk in the corn starch until completely dissolved and let the liquid sit for 10 minutes to thicken. 

ALL FOR TODAY!

HAPPY HALLOWEEN!!

KEEP HAVING FUN AND BEING SILLY 
IN YOUR OWN KITCHE!!!


www.cookwithcindy.com


Friday, September 2, 2022

CALAMARI FRITTI

OK...this is really just Fried Calamari, but thought it sounded more elegant as Fritti! I've made this a couple times now and keep tweaking. Thanks to my good friend Brenna Reilly, I think I now have the soaking and flouring technique down. Next time I will add some Italian herbs-basil and oregano, a little garlic powder, dash of pepper flakes to the breading, and a squeeze of lemon juice to finish after frying. If served with a rich Marinara sauce, I can then actually call it Calamari Fritti! 

No dipping sauce this time; just a simple coleslaw.
Ingredients:
1 lb. frozen calamari rings, thawed
Kosher salt, 1 tsp. More for seasoning after frying.
1/2 cup milk
1 egg, slightly beaten*
1 1/2 cups plain white flour**
1/3 cup cornstarch
1/2 tsp. baking powder
1/2 tsp. freshly ground black pepper
Vegetable oil for frying

*This is the new ingredient. The first time I made it without and as the calamari fried some of the batter slipped off. I thought the baking powder and cornstarch would be enough to hold it, but the egg made all the difference.

**You will have leftover batter, but it's so convenient to have on-hand in your pantry for your next batch. 


Preparation:
In a medium bowl stir together 1 tsp. salt, 1/2 cup milk and the egg. Add the calamari. Refrigerate for at least 30 minutes or up to 2 hours. This milk-bath helps tenderize the calamari and also softens the flavor. Calamari is the Italian word for squid, and although milder than octopus, calamari's cousin, it still can be a little strong.
 
In a large bowl, whisk together the flour, cornstarch, baking powder, black pepper. Set a large colander in the sink. Using tongs, lift about 1/3 of the calamari's out of the milk, shake them off and gently drop them into the flour mixture to thoroughly coat. Put them in the colander. Repeat with the rest of the calamari. 
Turn your oven on low as you'll want to keep the calamari warm as you fry in small batches. Prepare a large sheet pan and set a wire rack covered with a paper towel over the top. As each portion fries, remove to the sheet pan and keep warm in the oven.

Heat about 3 inches of vegetable oil in a heavy-bottomed skillet. The oil should heat to around 350 degrees. For best results, test the oils' heat by dropping one calamari into the oil. If many bubbles form around it and it floats you can add more. You do not want to crowd the calamari as they fry as that can loosen or break off the batter. How many you add depends on the size of your pan.
You can use tongs to drop the calamari in.
I used my fingers. 

After about 3 minutes they should turn golden brown. Remove the calamari to the rack on the sheet pan. Liberally salt and pop into the oven. Repeat frying until all calamari are fried. 

Ready to serve!

MAKING FRIED CALAMARI IS EASIER THAN IT SOUNDS!

SO MUCH TASTIER THAN IN A RESTAURANT!

UNTIL NEXT TIME...KEEP ON FRYING, BAKING, BRAISING, SMOKING, SIZZLING AND 
HAVING FUN IN THE KITCHEN!

WWW.COOKWITH CINDY.COM


Monday, August 22, 2022

NOT YOUR ORDINARY TUNA SANDWICH!


SEARED TUNA & AVOCADO ROLLS

This is an Ina Garten--The Barefoot Contessa--recipe. I admit, I love just about everything Ina does and this Tuna Roll did not disappoint. The two things that made it so special, other than the beautifully seared Ahi Tuna steaks, were the Chipotle mayo and the pickled shallots. I did not make the rolls, but got some very fresh sourdough rolls from the bakery.

Ingredients:

3/4 lb. sushi grade tuna steak, sliced about 3/4 inch thick

Good quality olive olive; 1/4 cup plus more for brushing on tuna

Kosher salt and freshly ground pepper

Grated zest of 1 lime

3 Tbsp. freshly squeezed lime juice

1 1/2 tsp. soy sauce

6 dashes Tabasco sauce 

1/4 cup minced fresh jalapeno (I didn't have fresh jalapeno so used a big dash of red pepper flake.)

1/4 cup minced scallions, both white and green parts; about 2 scallions

1 ripe avocado

1 shallot, halved lengthwise and thinly sliced crosswise

2 Tbsp. good red wine vinegar

2 Tbsp. butter

6 top-split hot dog-type rolls; split the rolls if they did not come pre-split

Chipolte Mayonnaise (recipe follows)

This Tuna Roll made my friend, Brenna Reilly, happy!
That makes me happy!

Preparation:
Heat a medium dry cast-iron skillet over high heat for 3 minutes. Brush the tuna, both sides with olive oil and sprinkle generously with salt and pepper all over. Sear the tuna for exactly 1 minute on each side. The inside will be raw. Transfer to a cutting board, cut into 1/2 - 3/4 inch dice.

In a large bowl combine 1/4 cup olive oil, the lime zest, lime juice, soy sauce, Tabasco, 1 1/2 tsp. salt and 1/2 tsp. black pepper. (Ina uses 1 full tsp. black pepper.) Add the tuna, scallions and jalapeno or pepper flake. Stir gently so you don't break up the tuna pieces. Cut the avocado in half, remove the pit, peel and cut into 1/2 - 3/4 inch dice. Carefully stir the avocado into the tuna mixture. Set aside for at least 20 minutes. I made this first thing in the morning and let it marinate until noon.
My husband Jerry loved these Tuna rolls,
but doesn't get quite as excited about
food as Brenna and I do!

FOR THE PICKLED SHALLOTS:
Combine sliced shallots and vinegar in a small bowl. I also added a few grinds of sea salt. Set aside. Again, I made the pickled shallots early so the flavors had a chance to really come together. 

Place the 2 Tbsp. of butter in a large saute pan over medium-high heat and heat until the butter sizzles. Without opening the buns, toast them on each side until nicely browned. Line the buns up on a platter, cut sides up, and spoon the tuna mixture into the buns. Drizzle with the chipolte mayo and sprinkle on the pickled shallots. Serve when the buns are still warm.

FOR THE CHIPOTLE MAYONNAISE
Ingredients:
1 cup mayo
1 canned chipolte pepper in adobo sauce
2 tsp. adobo sauce (I used 1 tsp.) from the can
1 tsp. freshly squeezed lime juice
I also added a big dash of smoked paprika.
Kosher salt to taste


Preparation:
Place the mayonnaise, chipolte pepper, adobo sauce, lime juice and 1 1/4 tsp. salt in the bowl of a food processor. Process until smooth. This lasts in the fridge for up to a week. 


THAT'S ALL FOR TODAY FROM A RAINY 

DRIZZLING IRISH DAY!


TUNE IN AGAIN SOON...FOR ANOTHER EPISODE OF...


WWW.COOKWITHCINCY.COM


Tuesday, August 16, 2022

CHICKEN TWO WAYS!

We eat a lot of chicken so I am always trying to think of new ways to prepare it. Recently I came up with these two chicken dishes; one using thighs and the other using breasts. They really don't even need a recipe, but I will tell you how I put them together. I also love stuffing and rolling chicken!

The first was stuffed with some very interesting flat nectarines, also known as donut nectarines. I had never had these before. I believe these were grown in Spain. They are incredibly sweet with a firm, juicy texture and very delicate skin so no need to peel. Perfect for stuffing!

CHICKEN BREASTS STUFFED WITH 

NECTARINES, SPINACH AND GOAT CHEESE


Here are some Donut Peaches, cousin to the Donut Nectarines.

I served these with a couple zucchini cakes. I used to make these cakes using flour instead of Panko. The Japanese breadcrumbs are much lighter and make a nicer, crispier cake. First the cakes...

To make the cakes:

Using a box grater, grate 1 large unpeeled zucchini to make 4 cakes. Over a colander, take one handful at a time of zucchini and squeeze out as much liquid as possible. Set aside in the colander. 

In a separate bowl add: 1 large clove minced garlic, 1/2 cup grated parmesan cheese, 1 large, slightly beaten egg, 1/2 cup Panko bread crumbs, herbs of your choice--I like to use fresh oregano, salt, and pepper, and finally add the zucchini and mix well. The mixture should be moist, but firm enough to hold its shape. If it is not, add a little more Panko. On a large plate or platter mound up 4 large circles of Panko. Drop the zucchini onto each and press slightly to form a round cake or patty. Top with more Panko and using your hands gently press the Panko on top and all sides of the zucchini cake. Cover with plastic wrap and refrigerate until ready to fry.

To make the Stuffed Chicken Breasts:

That martini has nothing to do with the recipe!

Using a mallet or rolling pin gently pound the chicken until it's even and about 3/8 inch thick. Liberally salt and pepper both sides. If you can't find Donut Nectarines, any nectarine will work or even the peaches, but if using peaches, I recommend peeling. 
Spread softened goats cheese on each chicken breast. Top with a generous amount of spinach and finally the sliced nectarine. Gently roll up the chicken using your fingers to stuff the filling back in as you roll, as it will most likely slip out.
The chicken stayed together nicely so no need to tie it off. Top with olive oil, more salt and pepper and a sprig of rosemary. Bake in preheated 400 degree oven for about 25 minutes. I like my chicken very juicy and tender, not dry so err on the side of less cook time. Recommended internal temp should be around 165 F (74 C), but I generally pull them out at around 160. They do keep cooking a bit. The salty cheese is a perfect complement to the sweet nectarines. I think you will like this chicken dish!

NEXT UP...

CHICKEN THIGHS STUFFED WITH LEEKS, CHESTNUT MUSHROOMS, WRAPPED IN SMOKED, AGED 
BLACK FOREST HAM


Bone the chicken thighs. This is much easier than it sounds if you have never done it. Open the thigh. Place a sharp paring knife just under the bone near the center of the thigh and carefully separate the flesh from the bone. Work the knife all the way down the bone and circle around the bumpy cartilage at the end. Repeat on the other side. The bone should come right out. Save the bones for soup stock!

HERE'S YOUR INGREDIENT LIST:
2 large chicken thighs
Salt/Pepper
Mayonnaise
Grainy Mustard
Chestnut or Portobello Mushrooms, enough to cover the inside of both thighs
Leeks, sliced, and lots!
Aged Black Forest Ham, 2 slices per thigh
Olive Oil
Dried Tarragon

Maille has been making mustards since the 1700's. This beautiful French wholegrain mustard is my go-to. Their Dijon mustard is also lovely. But use whatever wholegrain you have in your pantry! 

TO ASSEMBLE:

Lay the boned chicken skin side down. Liberally salt and pepper both sides. Spread a generous amount of mayonnaise on the inside of each thigh. Top with a generous amount of wholegrain mustard. Top that with the sliced leeks and sliced mushrooms. This is a little tricky because the mayo/mustard makes the filling quite slippery, but gently coax the thighs into a roll. Again, use your fingers to keep stuffing mushrooms and leeks back inside. Once you have rolled them, wrap 2 pieces per thigh of the Black Forest Ham, seam side down. That helps hold everything together. Drizzle with olive oil and then top with dried tarragon. 

Bake in preheated 400 degree F oven for 30 minutes. Check the temp and when done, let rest for 10 minutes. The recommended temp on the thighs is 170, but I usually cook to 165. 

HOPE YOU'VE ENJOYED THIS CHICKEN ADVENTURE!

IRISH CHICKENS ARE THE BEST! 
THE GOVERNMENT IS VERY CAREFUL 
ABOUT THE CARE AND PRODUCTION OF 
COMMERCIALLY RAISED CHICKENS 
AND IT'S OBVIOUS IN THE TASTE!

UNTIL NEXT TIME...

This is our neighbors crazy horse who runs
wildly through the field next door.
It looks like he's about to jump off the roof
of our shed!


WWW.COOKWITHCINDY.COM


Saturday, July 30, 2022

TWO BELOVED OLD-FASHIONED SWEET TREATS!


STRAWBERRY SHORTCAKE

I believe the most important component of the classic Strawberry Shortcake are the biscuits. I prefer a buttery, flaky biscuit; definitely not spongey or cake-like. Fresh, vine-ripened strawberries also make a huge difference. The strawberries this time of year in Ireland are plentiful, plump, ripe and juicy. Freshly whipped cream tops the Shortcake. So simple and delicious. I made the shortcake biscuits a few weeks ago and froze them so putting the Strawberry Shortcake together last night was very easy. 

BUTTERMILK BISCUIT INGREDIENTS:

3 cups all-purpose flour

4 tsp. baking power

1 tsp. baking soda

1/3 cup white sugar

1 1/2 tsp. salt

3/4 cup (1 1/2 sticks) chilled butter, cut into small pieces*

1 cup buttermilk

2 Tbsp. heavy cream,

1/4 cup turbinado sugar

8 cups fresh strawberries, sliced and mixed with about 1/4 cup white sugar**

Generous amount whipped cream for topping

*I almost always use salted butter, but many bakers prefer unsalted as you have better control over the salt level. I like salt even in sweet treats!

**Mix well the berries with the sugar and let set at least 1/2 hours. Once macerated the berries give off a lovely juice.

Preparation:

Preheat oven to 425 degrees (220 degrees C).

Line a baking sheet with parchment paper. 

Whisk together flour, baking power, baking soda, 1/3 cup white sugar, and salt in a mixing bowl.

Cut in cold butter with a knife, pastry blender, food processor by gently pulsing or you can even use your fingers to incorporate the butter until it is the size of peas.

Stir in the buttermilk until the flour mixture is just moistened. Do not over-mix. This will cause your biscuits to get tough.

On a floured surface drop the flour/butter mixture and using your hands press the dough together to form a round shape about 1 inch thick. The mixture will be crumbly, but there is so much butter in these biscuits that it comes together as it bakes. 

Using a biscuit cutter, glass or in my case, I used a 1 cup measuring cup, which made rather large biscuits, cut the biscuits into rounds. Place on the prepared baking sheet about 2 inches apart. They will spread.
Brush the top of the biscuits with heavy cream and sprinkle generously with turbinado sugar. 

Bake until golden brown; about 15-20 minutes.

Cool on a rack.
Because my biscuits were so large I only got 9 out of it. You could make them smaller and serve 2 biscuits per serving.


ANOTHER OLD-TIME FAVORITE...

APPLE CRISP

This dessert comes together very easily and will fill your house with warm, comforting aromas reminiscent of eating at your Nanna's on a Sunday afternoon, which we did every week growing up.  Even though it's only the end of July, autumn comes early in Ireland. By mid/late-August days become shorter and leaves start to curl and brown. This dessert reminds me of the fall.

You can make this with a variety of apples. Last time I used 3 green Granny Smiths and 3 Galas. This morning I used 6 Pink Ladies. Both were delicious!


Ingredients:
6 apples, peeled and chopped
2 Tbsp. white sugar
2 Tbsp. cinnamon, divided
1 1/2 tsp. fresh lemon juice
1 cup brown sugar
3/4 cup old fashioned oats
3/4 cup all-purpose flour
1/2 cup (that's 1 stick) cold butter (again, I prefer salted butter) diced
Pinch of Kosher salt

Preparation:
Preheat over to 350 degrees F (180 C). Generously butter an 8x8 inch baking dish. Set aside.
In a mixing bowl, add chopped apples, granulated sugar, 1 Tbsp. cinnamon and lemon juice. Stir to combine and then transfer to the buttered baking dish.
In a separate bowl combine the topping ingredients: Brown sugar, oats, flour, 1 Tbsp. cinnamon, salt, and diced cold butter. Use a pastry cutter, 2 knives, or your fingers to incorporate the butter thoroughly until the butter is the size of peas. 
Spread the topping over the apples and gently pat to even it out. Bake 40 to 45 minutes until golden brown and bubby. Serve either warm or room temperature. Excellent with a dollop of freshly whipped cream or rich, homemade vanilla ice cream. We had ours this time with the whipped cream. 
My husband, Jerry, LOVES his sweets!

I HOPE YOU ENJOY PLAYING IN YOUR 
KITCHEN AS MUCH AS I DO!

UNTIL NEXT TIME...

KEEP ON LOVING...KEEP ON COOKING!

WWW.COOKWITHCINDY.COM


Saturday, July 23, 2022

UDON NOODLES!

So what are Udon Noodles? They are a thick, chewy, delicious Japanese staple. Traditionally served in soup, but also can be stir-fried, served with dipping sauce or even eaten cold. I have never made Udon Noodles so thought it was time I tried. I did a bit of research and found a recipe online that sounded intriguing. Mainly because of the technique used to knead the noodle dough.

But first, let's start with the recipe...the recipe I found on the Chopstick Chronicles site seemed like it was translated from Japanese so I had to do some guessing, but with only 3 ingredients how could you go too far wrong? 

Ingredients:
15 g. salt (3 1/2 tsp.)
140 ml. water (2 1/2 cups)
300 g. all-purpose flour (1 1/4 cups)
Generous amount of corn or potato starch for rolling out the noodles

Preparation:
In a jar or bowl dissolve the salt in the water. Place the flour in a large bowl and add the salt water gradually to combine with the flour by using either your finger or a chopstick. I used my fingers. If the dough is not coming together, add more water 1 Tbsp. at a time. 

At this stage, do not knead, just stir to combine the flour and water to make a nice, soft dough. After all the water has been added, knead the dough together into a round shaped ball. Here's where the fun begins. Place the dough into a large ziplock bag and seal the bag. Knead by stepping on the dough 50 times.

Repeat the process 3 times (for 150 steps). After 3 times, take the dough out and gently fold it over several times. Return to the bag and step 50 more times for a total steps of 200. This really is fun and would be a treat to do with kids. Take the dough out and shape it into a neat round ball. Leave the dough, covered with plastic wrap, for at least 1 hour and up to 3 hours at room temperature. I left mine for 3 hours.

After 3 hours of resting, dust a surface with corn (or potato) starch and roll the dough out from the center to the outer edges. The dough should be 3 mm (about 1/8 inch) thick. Then cut the dough with a sharp knife into strips about 1/8 inch wide. The dough is quite elastic so can be stretched and rolled on the counter or board to make a nice round noodle. I got a little excited and didn't get the noodles quite as evenly shaped as I'd wished, but they sure were delicious!

Bring a large pot of salted, boiling water to boil. The large quantity of water is necessary as it helps prevent the noodles from sticking together. Drop the noodles in and cook for 10 - 12 minutes. Drain the noodles in a colander and rinse the cooked noodles under running water. The rinsing helps the noodles from sticking as they are quite sticky.
You could then make the traditional soup, called Kakejiru which is made from the Japanese version of mirepoix (carrots, celery, onion) or in Japan: dashi, soy sauce and mirin. 

I stir-fried pork strips with mushrooms, garlic, yellow bell peppers, broccoli, lots of fresh basil. In a separate saute pan make a roux with sesame oil and flour. This made just the right base for the sauce. Add the soy and teriyaki, lime, and pepper flake to achieve the right consistency. Mix the pork and veg together with the sauce and then gently fold in the Udon Noodle. 
Adding lots of fresh basil. 
Udon Noodles are the quintessential Japanese comfort food. They were very easy to make and I will be making them again with chicken, beef, lots of fresh ginger root, possibly even cabbage. Endless possibilities!

Just for the record, I do not believe Chef Morimoto kneads his Udon Noodles with his foot, but will have to look into that further. 

UNTIL NEXT TIME...

SAYONARA!
We've had a nest of herons with us
since early spring. So entertaining and
such a prehistoric looking creature!

www.cookwithcindy.com


Wednesday, July 20, 2022

ONE POTATO...TWO POTATO!

Soup, that is! I love making soup and the beauty of these two soups is they are delicious either hot or cold. First I'm going to share a recipe from my friend Brenna Reilly's family. Growing up Brenna said this was the 'go-to' soup her Mom would make to help feel better, cheer her up, or just set things right with the world. It is very comforting.

SWEET POTATO GREEN PEA SOUP 

WITH CARAMELIZED ONIONS

Ingredients:
2 large sweet potatoes, about 4 cups, cubed, washed, but not peeled
2 onions, sliced
1 small garlic clove, smashed
2 Tbsp. olive oil
6 cups chicken stock
Salt/Pepper
2 cups frozen peas

Preparation:
In a large soup pot, heat the olive oil until nearly smoking. Add the sliced onions, salt and give them a good stir. Cover and reduce heat to a low simmer and slowly cook down the onions; about 20 minutes. Once the onions have caramelized and are slightly brown add all other ingredients, except the frozen peas. Bring to a boil and then reduce heat and cook gently on simmer for about 1 1/2 - 2 hours until the potatoes nearly fall apart. The amount of salt and pepper will depend on how salty your stock is so taste and season accordingly. Cool completely in the soup pot and then blend until very smooth. Add a little more chicken stock if it is too thick. You want the soup to have substance, but not be the consistency of baby food. I did not serve this soup immediately so added the peas, still frozen to the soup base. They cook when you reheat. Brenna's Mom serves the soup with a dollop of garlic mayo. I did the same and don't know why I have no photos. Usually I am photo crazy when I cook. The soup is amazingly smooth and satisfying. 

NEXT UP...ANOTHER...

POTATO SOUP
This potato soup is much lighter than traditional French Vichyssoise, but has a very similar flavor. It is also good served either hot or cold. I think it would be fun to make with purple potatoes.

Ingredients:
2 cups Golden Potatoes, peeled and cubed
2 cups rich chicken stock*
1/2 small onion, chopped; about 1/4 cup
1 garlic clove, smashed
1/3 cup light cream
1 Tbsp. butter
Salt/Pepper
Chives, optional garnish

* I had recently roasted a chicken using some beautiful duck fat so the stock I made from those bones had a very deep, rich flavor. You could also add 1 Tbsp. of duck fat in place of the butter or just butter alone will work, too.

Preparation:
Add all ingredients to a soup pot and bring to a boil. Reduce heat and simmer until potatoes are very tender. Cool completely and then blend until very smooth. 

Soup is so easy to make and nice to have on hand for a quick lunch, starter course, or if the unexpected company arrives!

THAT'S ALL FOR TODAY. 
Julie and Lily say HI!

HOPEFULLY THESE SHOTS FROM IRELAND 
MAKE UP FOR THE LACK OF POTATO SOUP PHOTOS!
Galway is playing Derry this Sunday in the
All-Ireland football finals. We are flying the colors!

UNTIL NEXT TIME...
And here is my humble herb garden
just outside my kitchen door.


www.cookwithcindy.com