Tuesday, March 19, 2013

Cruciferous Veg and More!

Don't you just love how that word...CRUCIFEROUS!...gently rolls right off your tongue. What's interesting are the variety of vegetables that fall into the cruciferous family--many colors, shapes, and sizes. For example: Cauliflower, Brocolli, Cabbage, Brussel Sprouts are cruciferous vegetables, but how can Spinach, Radish, Parsnip, and even Bok Choy be in that category as well? All of these vegetables are in the cabbage family and they get their name from their four-petaled flowers which resemble a crucifer or cross.

What is even more interesting are these vegetables all do different things in terms of good health so my general rule: eat lots of them and in great variety. These veg are sometimes known as Super Vegetables as they have so many goodies in them:  fiber, vitamins, minerals, and disease fighting phytochemicals, which act as antioxidants. They are not only good for you, but they are delicious, low in calorie and good either cooked or raw.

Here is a very simple recipe for Roasted Sicilian Cauliflower...
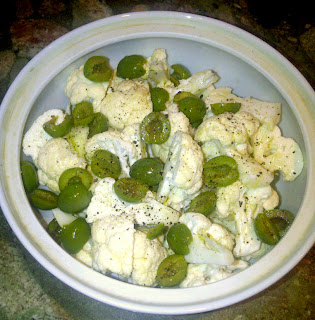
This is the cauliflower before it is roasted. Once cooked the cauliflower gets golden brown.
Ingredients:
1 head cauliflower, cut into florets
24 Black or Green olives, sliced in half if they are very large
12 cloves garlic, peeled, smashed and chopped coarsely
8 anchovy filets, minced (I was out of anchovies so skipped them and it was still delicious!)
2 Tbsp. Olive Oil
1/2 tsp. hot pepper flakes
Salt/Pepper (Be cautious with the salt if you are using the anchovies.)

Preparation:
Preheat oven to 375.
Place cut cauliflower and all other ingredients in a large bowl and toss until the cauliflower is evenly coated. Place in a casserole and bake covered for about 30 minutes stirring every 15 minutes. Uncover and bake another 20-30 minutes until cauli is tender and golden brown.

The roasting gives the cauliflower a nutty flavor and because it is a fairly strong flavored vegetable it stands up well to strong flavors.

I would not think leafy veg like kale and spinach are cruciferous, but they are. Here is a simple, but delicious way to prepare kale--one of my favorite leafy vegetables.
 
KALE AND WILD MUSHROOM SAUTE


I used 2 different types of wild mushrooms, Bunapi and Maitake, but use whatever mushroom you like or have on hand. Mushrooms are another vegetable filled with healthy nutrients; potassium for one. Mushrooms contain more potassium than do bananas so if you're having those leg cramps at night, reach for some mushrooms! I like leftover wilted vegetables so I used a whole bunch of kale and each bunch of mushroom. Wash the kale and chop. Shake, but don't worry if the kale stays wet. Rinse the mushrooms; stem and cut apart if they come in a bunch. If you are using buttons, slice. Heat about 2 Tbsp. Olive Oil in a large frying pan. Add 4 cloves minced garlic and stir for a couple minutes until soft. Do not let the garlic brown or it will get bitter. Add the mushrooms and saute gently for about 5 minutes. Increase the heat to medium high and add the kale. Season with salt/pepper. Salt helps retain the bright green color of the kale. The water you have rinsed the kale in helps to steam the kale. Stir every few minutes until kale is wilted--about 10 minutes and serve.

To learn more about mushrooms nutritional value go to: http://www.fitday.com/fitness-articles/nutrition/calories/the-nutritional-value-of-mushrooms.html

Some root vegetables, like radishes, turnip and parsnip are also in the cruciferous family. I love turnip and just used on Sunday (St. Patrick's Day!) in a corned beef and boiled dinner I made for the occasion. My husband is not a big fan of turnip so I don't cook them often, but I love their strong and distinctive flavor. I generally just steam them in salted water, give them a quick mash, add a little butter, season with salt/pepper and serve. Turnip is also a wonderful addition to vegetable soup.

Arugala is also a leafy cruciferous vegetable. Here's a recipe for a fabulous salad. I love the spicy, peppery flavor of arugala and this salad has the perfect balance of textures.


ARUGALA, POTATO, GREEN BEAN 
AND WALNUT SALAD
Ingredients:
1/3 cup walnuts
2 Tbsp. white wine vinegar
2 Tbsp. non-fat plain yogurt
1 tsp. Dijon mustard
1 tsp. coarse salt
Freshly ground pepper
2 Tbsp. walnut oil (Use extra virgin Olive Oil if you don't have walnut oil in your pantry.)
1 1/2 lbs. fingerling potatoes, cut crosswise into 1/2 inch rounds
6 oz. haricots verts or green beans, trimmed
3 oz. baby arugala

Preparation:
Preheat oven to 375. Place waluts on a baking sheet. Toast in oven until fragrant, about 8 minutes. Let cool slightly. Finely chop and set aside.
Whisk together vinegar, yogurt, mustard, 1/2 tsp. salt, and the toasted nuts in a small bowl, season with pepper. Add oil in a slow, steady stream, whisking until emulsified. Set dressing aside.
Bring medium saucepan of water to a boil. Add potatoes and cook until tender, about 10 minutes. Using a slotted spoon, transfer the potatoes to a colander to drain. Set aside.
Prepare an ice water-bath by filling a bowl with water and adding about a dozen ice cubes. Set aside. Return the saucepan of water to a boil. Add green beans and cook unter tender and bright green, about 4 minutes. Using a slotted spoon, transfer the beans to the ice-bath to stop the cooking. Transfer to a cutting board and cut into 2 inch pieces.
Arrange arugala, potatoes, and green beans on a platter. Season with remaining 1/2 tsp. salt and 1/4 tsp. pepper. Drizzle with dressing; toss to coat.

Well, that's all for today. Hope you enjoyed an all-veggie blog this time. I eat tons of vegetables not necessarily because they are good for you, but mainly because I love them. I hope you learned a bit about cruciferous vegetables and some different ways to enjoy them. 

Please remember to relax and have fun in the kitchen. Get silly, mix it up, play with your food and for goodness sake...
EAT YOUR VEGETABLES!

Tune in again soon for another episode with:
 
 
Here I am in Ireland outside the chow hall at a circa 1200's castle called Aughnanure.
I think the sign is a bit more recent!
http://www.all-ireland.com/attractions/connaught/galway/aughnanurecastle.htm


Saturday, March 9, 2013

Tips, Tools, and Technique

My first tip is regarding my last blog. If you received the blog via email you probably were not able to view my video debut. Two solutions: either go to the top of the email where you will see a line reading something like: If you are having trouble viewing this email, click here to view it in your browser. That should allow you to open the videos. The other, and I think better answer, is simply to go to: www.cookwithcindy.com and view the videos in the actual blog.

HOLD YOUR BOWL IN PLACE
Next, a tip on holding bowls in place while you are stirring, beating or whisking. You may have heard this before, but it is a simple way to hold a bowl in place allowing you to use both hands-one for beating and the other possibly for adding ingredients as you mix. Bunch up a dish towel and place the bowl on top of the scrunched dishtowel which holds the bowl in place while you are beating.

TIDY UP AS YOU GO
Everyone has their own style of cooking, but I recommend you clean up as you go. It helps me stay organized and focused if I rinse and put things in the dishwasher or wash the special knives by hand as I prepare a meal. It also is very welcome when you finish prepping a meal, especially a big dinner, if you don't have a mound of dirty dishes to face, allowing you to sit down and relax with a glass of wine before your guests arrive.

KEEP POTHOLDERS HANDY
Here's a tip I just learned from one of my favorite magazines, "Cook's Illustrated". Use shower hooks on your oven door to make pot holders and dish towels easily accesssible.


And speaking of pot holders, my Mom made both the turtle and the fish. Every year for Christmas she made a different pot holder for all the kids in the family. My all-time favorite was the one she made when I bought my first (on my own) home in the Jamaica Plain section of Boston. The house was sided in pink asbestos shingles and we affectionately called the house Big Pink...lots of fun dinner parties took place in that house!
As you can see this one has been well used over many, many years!

My Dad every year for Christmas made cutting boards. He had two designs: hearts and apples. These two were made from a huge black walnut tree that grew in our front yard. Black walnuts are beautiful trees and the grain is very fine making the wood extremely hard...perfect for cutting boards, but the tree was messy and a lot of work to clean up after in the spring so it finally came down and was transformed into cutting boards, ornamental boxes, tables and anything else my father could think of to make!
I think the grain is beautiful! The Black walnuts are also delicious to eat, but hard to crack!

EASY BERRY HUSKING
I have mentioned this tool in previous blogs, but need to discuss again as the more I use it, the more I realize just how good it is. It makes husking strawberries fast and easy! Just push the prong in, twist and pull out the stem and core.
This was a gift from my brother and his wife at Christmas. They also gave me a rubber whisk which acts as both whisk and rubber scrapper. Really, very handy!

RE-GROW SCALLIONS
Here's a tip, also from "Cook's Illustrated" that I have not yet tried myself, but I will the next time I buy scallions. One of the features about "Cook's" that I like is that it is filled with tips, technique suggestions, and also reviews on cooking utentils, pots, pans, knives, etc. Publisher, Christopher Kimball is also a great writer and tells wonderful stories of life in Vermont where he lives and the magazine is published. In every issue they also 'fine-tune' recipes in their Test Kitchen to give you the best-ever recipes! So here's the tip:  Cut the green portion off a bunch of scallions and place the bulb/root ends in a glass of water. Within 3 days the green starts to grow back and you can use them all over again! They are more crisp than the ones you bought in the store as they are completely fresh. The process can be repeated a second time, but the greens will be a bit more wispy and not quite as pungent. The second round also takes a bit longer to grow.


Here's another tip from "Cook's Illustrated"...

HOW TO COOK THE PERFECT SOFT EGG
I love soft poached or soft boiled eggs and take pride in the challenge of cooking the perfect egg so the yolk is soft and creamy and the whites are totally set, but I have never used this method before. I tried it last week and it really is a great method for perfectly soft eggs. I served the eggs on whole grain English muffins, topped with a thick piece of beautiful Black Forest Ham and then finally the soft egg.  Here's the method:


Be sure to use eggs that have no cracks and are cold straight from the refrigerator. One of the eggs I used had a crack that I did not see before starting which made the end result a little less than perfect looking, but still tasted great. This method works for 1 to 6 large, extra-large or jumbo eggs without altering the cooking time. That seems odd to me, but I trust "Cook's".  I used 4 large eggs.

Bring 1/2 inch water (really?? only 1/2 inch?!?) to a boil in a medium saucepan over medium-high heat. Using tongs (I used my fingers), gently place eggs in boiling water (the eggs will not be submerged). Cover saucepan and cooks eggs for exactly 6 minutes.

Remove cover, transfer saucepan to the sink, and place under cold running water for 30 seconds. Remove eggs from pan and serve, seasoned with salt and pepper to taste. "Cook's" suggest removing the top of the egg and serving in egg cups. I chose to peel the egg.

To peel the eggs, gently crack the broad end against a hard surface and then peel away the shell and the inner membrane. A quick rinse in warm water removes any remaining wisps of membrane and shards of eggshell. Split the eggs in half and serve. Caution: when splitting remember the yolks are soft so will run out easily if you are not careful.

EASY BREAKFAST


Cantalope with cottage cheese and fresh strawberries.

Well, this was a different twist on my blog. Next time, back to recipes! I love talking about anything and everything related to food. My all-time favorite cooking magazine was Gourmet. I used to anticipate every issue and would spend hours pouring over it when it arrived in the mail. I am so sad they have gone out of business. I was a faithful follower for many years. I never threw out an issue, but finally, after moving boxes of old Gourmets more times than I want to remember, I cut out my favorite recipes and created 5 fun recipe books.
Yes, that is ME on the cover!
 

Thanks again for allowing me to share my passion with YOU!


Monday, March 4, 2013

Boneless Leg Of Lamb!

I have talked about boneless leg of lamb in previous blogs, but I want to share one more recipe with you that I put together Saturday night. We usually reserve lamb for special occasions, holidays, especially Easter, but lamb was on sale at my local super market last week and I couldn't resist picking one up. This is an easy recipe to put together and I am including for the first time on my blog a couple short videos to help show you just how easy it is!
BONELESS LEG OF LAMB
I actually prefer my lamb more rare than medium, but I was cooking for the 'crowd' so chose medium. My rule of thumb for lamb is 15 minutes per pound. This time I went for about 20 minutes per pound, which is more medium than rare. It was still very moist, succulent and filled with flavor.

Ingredients:
Boneless Leg of Lamb, mine was 4.75 lbs.
Salt/Pepper
4 Tbsp. Basil Pesto
3 cloves garlic, chopped
1/4 cup pine nuts
1 tsp. dried onion
2 cups baby spinach leaves, washed and stems removed
2 cups bread crumbs from 2 slices of bread if making yourself
1/3 cup feta cheese

Preparation:
First, remove the string bag on the lamb and lay the lamb (inside of leg up) onto a cutting board. Then cut away all silver skin, connective tissue, fat, and sinew. Next you need to BEAT YOUR MEAT, which both tenderizes and evens out the thickness. Beat to about 1/2 inch thick.


Salt the leg liberally (about 1 tsp.). Spread 4 generous Tbsp. of basil pesto over the leg. Add chopped garlic. Heat 2 Tbsp. butter in a frying pan, add bread crumbs and stir just until crumbs are mixed with the butter.

Add 1/4 cup pine nuts*, then the dried onion, spread the spinach leaves evenly over entire leg, add 2 cups buttered bread crumbs and 1/3 cup feta cheese. Now you are ready to ROLL THE LAMB.


*Why are pine nuts so expensive? I believe two reasons. One, it take the nut (or actual seed from the pine cone) 18 months to fully mature making the growing season VERY long; and Two, harvesting pine nuts is extremely labor intensive. The good news is that the flavor of the pine nut is quite strong so a little bit goes a long way.

Score the lamb by gently slicing into the fat on the top of the leg. This releases fat into the meat while the leg is roasting making it more tender and juicy. Once the leg of lamb is rolled, TIE THE LEG OF LAMB.


Bake in preheated 350 degree oven for 15 minutes per pound for rare lamb and 20 minutes per pound for medium. Baste the lamb every 15 or 20 minutes to ensure that the meat is very juicy.


It is easiest to remove the lamb from the oven to baste; also results in fewer burned fingers! Once the leg is cooked to your liking, remove from oven. Tent loosely with foil and let rest for 10-15 minutes. Remove the kitchen string and cut into 1/2 inch slices. I served it with minimal sides: pizza dough rolls topped with parmesan and a hot cherry tomato salad with feta, pine nuts, shallot and garlic. I wanted the lamb to be the star of the show!

I hope you enjoy this recipe for boneless leg of lamb and also hope the videos helped you see how easy it is to put together. For those of you who follow this blog you know that for me it is all about having FUN! I am not a professional chef, but love cooking and believe passion will carry you far in the kitchen. Special thanks to my producer (my son Michael!) for shooting these videos!

UNTIL NEXT TIME, PLEASE REMEMBER...
 
RELAX AND HAVE A BALL IN THE KITCHEN!
 
COOKING DOES NOT HAVE TO BE A SERIOUS ENDEAVOR!
 
PLEASE TUNE IN SOON FOR ANOTHER EPISODE WITH: