Saturday, July 30, 2022

TWO BELOVED OLD-FASHIONED SWEET TREATS!


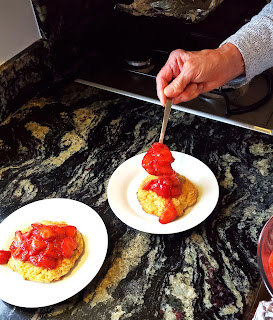
STRAWBERRY SHORTCAKE

I believe the most important component of the classic Strawberry Shortcake are the biscuits. I prefer a buttery, flaky biscuit; definitely not spongey or cake-like. Fresh, vine-ripened strawberries also make a huge difference. The strawberries this time of year in Ireland are plentiful, plump, ripe and juicy. Freshly whipped cream tops the Shortcake. So simple and delicious. I made the shortcake biscuits a few weeks ago and froze them so putting the Strawberry Shortcake together last night was very easy. 

BUTTERMILK BISCUIT INGREDIENTS:

3 cups all-purpose flour

4 tsp. baking power

1 tsp. baking soda

1/3 cup white sugar

1 1/2 tsp. salt

3/4 cup (1 1/2 sticks) chilled butter, cut into small pieces*

1 cup buttermilk

2 Tbsp. heavy cream,

1/4 cup turbinado sugar

8 cups fresh strawberries, sliced and mixed with about 1/4 cup white sugar**

Generous amount whipped cream for topping

*I almost always use salted butter, but many bakers prefer unsalted as you have better control over the salt level. I like salt even in sweet treats!

**Mix well the berries with the sugar and let set at least 1/2 hours. Once macerated the berries give off a lovely juice.

Preparation:

Preheat oven to 425 degrees (220 degrees C).

Line a baking sheet with parchment paper. 

Whisk together flour, baking power, baking soda, 1/3 cup white sugar, and salt in a mixing bowl.

Cut in cold butter with a knife, pastry blender, food processor by gently pulsing or you can even use your fingers to incorporate the butter until it is the size of peas.

Stir in the buttermilk until the flour mixture is just moistened. Do not over-mix. This will cause your biscuits to get tough.

On a floured surface drop the flour/butter mixture and using your hands press the dough together to form a round shape about 1 inch thick. The mixture will be crumbly, but there is so much butter in these biscuits that it comes together as it bakes. 

Using a biscuit cutter, glass or in my case, I used a 1 cup measuring cup, which made rather large biscuits, cut the biscuits into rounds. Place on the prepared baking sheet about 2 inches apart. They will spread.
Brush the top of the biscuits with heavy cream and sprinkle generously with turbinado sugar. 

Bake until golden brown; about 15-20 minutes.

Cool on a rack.
Because my biscuits were so large I only got 9 out of it. You could make them smaller and serve 2 biscuits per serving.


ANOTHER OLD-TIME FAVORITE...

APPLE CRISP

This dessert comes together very easily and will fill your house with warm, comforting aromas reminiscent of eating at your Nanna's on a Sunday afternoon, which we did every week growing up.  Even though it's only the end of July, autumn comes early in Ireland. By mid/late-August days become shorter and leaves start to curl and brown. This dessert reminds me of the fall.

You can make this with a variety of apples. Last time I used 3 green Granny Smiths and 3 Galas. This morning I used 6 Pink Ladies. Both were delicious!


Ingredients:
6 apples, peeled and chopped
2 Tbsp. white sugar
2 Tbsp. cinnamon, divided
1 1/2 tsp. fresh lemon juice
1 cup brown sugar
3/4 cup old fashioned oats
3/4 cup all-purpose flour
1/2 cup (that's 1 stick) cold butter (again, I prefer salted butter) diced
Pinch of Kosher salt

Preparation:
Preheat over to 350 degrees F (180 C). Generously butter an 8x8 inch baking dish. Set aside.
In a mixing bowl, add chopped apples, granulated sugar, 1 Tbsp. cinnamon and lemon juice. Stir to combine and then transfer to the buttered baking dish.
In a separate bowl combine the topping ingredients: Brown sugar, oats, flour, 1 Tbsp. cinnamon, salt, and diced cold butter. Use a pastry cutter, 2 knives, or your fingers to incorporate the butter thoroughly until the butter is the size of peas. 
Spread the topping over the apples and gently pat to even it out. Bake 40 to 45 minutes until golden brown and bubby. Serve either warm or room temperature. Excellent with a dollop of freshly whipped cream or rich, homemade vanilla ice cream. We had ours this time with the whipped cream. 
My husband, Jerry, LOVES his sweets!

I HOPE YOU ENJOY PLAYING IN YOUR 
KITCHEN AS MUCH AS I DO!

UNTIL NEXT TIME...

KEEP ON LOVING...KEEP ON COOKING!

WWW.COOKWITHCINDY.COM


Saturday, July 23, 2022

UDON NOODLES!

So what are Udon Noodles? They are a thick, chewy, delicious Japanese staple. Traditionally served in soup, but also can be stir-fried, served with dipping sauce or even eaten cold. I have never made Udon Noodles so thought it was time I tried. I did a bit of research and found a recipe online that sounded intriguing. Mainly because of the technique used to knead the noodle dough.

But first, let's start with the recipe...the recipe I found on the Chopstick Chronicles site seemed like it was translated from Japanese so I had to do some guessing, but with only 3 ingredients how could you go too far wrong? 

Ingredients:
15 g. salt (3 1/2 tsp.)
140 ml. water (2 1/2 cups)
300 g. all-purpose flour (1 1/4 cups)
Generous amount of corn or potato starch for rolling out the noodles

Preparation:
In a jar or bowl dissolve the salt in the water. Place the flour in a large bowl and add the salt water gradually to combine with the flour by using either your finger or a chopstick. I used my fingers. If the dough is not coming together, add more water 1 Tbsp. at a time. 

At this stage, do not knead, just stir to combine the flour and water to make a nice, soft dough. After all the water has been added, knead the dough together into a round shaped ball. Here's where the fun begins. Place the dough into a large ziplock bag and seal the bag. Knead by stepping on the dough 50 times.

Repeat the process 3 times (for 150 steps). After 3 times, take the dough out and gently fold it over several times. Return to the bag and step 50 more times for a total steps of 200. This really is fun and would be a treat to do with kids. Take the dough out and shape it into a neat round ball. Leave the dough, covered with plastic wrap, for at least 1 hour and up to 3 hours at room temperature. I left mine for 3 hours.

After 3 hours of resting, dust a surface with corn (or potato) starch and roll the dough out from the center to the outer edges. The dough should be 3 mm (about 1/8 inch) thick. Then cut the dough with a sharp knife into strips about 1/8 inch wide. The dough is quite elastic so can be stretched and rolled on the counter or board to make a nice round noodle. I got a little excited and didn't get the noodles quite as evenly shaped as I'd wished, but they sure were delicious!

Bring a large pot of salted, boiling water to boil. The large quantity of water is necessary as it helps prevent the noodles from sticking together. Drop the noodles in and cook for 10 - 12 minutes. Drain the noodles in a colander and rinse the cooked noodles under running water. The rinsing helps the noodles from sticking as they are quite sticky.
You could then make the traditional soup, called Kakejiru which is made from the Japanese version of mirepoix (carrots, celery, onion) or in Japan: dashi, soy sauce and mirin. 

I stir-fried pork strips with mushrooms, garlic, yellow bell peppers, broccoli, lots of fresh basil. In a separate saute pan make a roux with sesame oil and flour. This made just the right base for the sauce. Add the soy and teriyaki, lime, and pepper flake to achieve the right consistency. Mix the pork and veg together with the sauce and then gently fold in the Udon Noodle. 
Adding lots of fresh basil. 
Udon Noodles are the quintessential Japanese comfort food. They were very easy to make and I will be making them again with chicken, beef, lots of fresh ginger root, possibly even cabbage. Endless possibilities!

Just for the record, I do not believe Chef Morimoto kneads his Udon Noodles with his foot, but will have to look into that further. 

UNTIL NEXT TIME...

SAYONARA!
We've had a nest of herons with us
since early spring. So entertaining and
such a prehistoric looking creature!

www.cookwithcindy.com


Wednesday, July 20, 2022

ONE POTATO...TWO POTATO!

Soup, that is! I love making soup and the beauty of these two soups is they are delicious either hot or cold. First I'm going to share a recipe from my friend Brenna Reilly's family. Growing up Brenna said this was the 'go-to' soup her Mom would make to help feel better, cheer her up, or just set things right with the world. It is very comforting.

SWEET POTATO GREEN PEA SOUP 

WITH CARAMELIZED ONIONS

Ingredients:
2 large sweet potatoes, about 4 cups, cubed, washed, but not peeled
2 onions, sliced
1 small garlic clove, smashed
2 Tbsp. olive oil
6 cups chicken stock
Salt/Pepper
2 cups frozen peas

Preparation:
In a large soup pot, heat the olive oil until nearly smoking. Add the sliced onions, salt and give them a good stir. Cover and reduce heat to a low simmer and slowly cook down the onions; about 20 minutes. Once the onions have caramelized and are slightly brown add all other ingredients, except the frozen peas. Bring to a boil and then reduce heat and cook gently on simmer for about 1 1/2 - 2 hours until the potatoes nearly fall apart. The amount of salt and pepper will depend on how salty your stock is so taste and season accordingly. Cool completely in the soup pot and then blend until very smooth. Add a little more chicken stock if it is too thick. You want the soup to have substance, but not be the consistency of baby food. I did not serve this soup immediately so added the peas, still frozen to the soup base. They cook when you reheat. Brenna's Mom serves the soup with a dollop of garlic mayo. I did the same and don't know why I have no photos. Usually I am photo crazy when I cook. The soup is amazingly smooth and satisfying. 

NEXT UP...ANOTHER...

POTATO SOUP
This potato soup is much lighter than traditional French Vichyssoise, but has a very similar flavor. It is also good served either hot or cold. I think it would be fun to make with purple potatoes.

Ingredients:
2 cups Golden Potatoes, peeled and cubed
2 cups rich chicken stock*
1/2 small onion, chopped; about 1/4 cup
1 garlic clove, smashed
1/3 cup light cream
1 Tbsp. butter
Salt/Pepper
Chives, optional garnish

* I had recently roasted a chicken using some beautiful duck fat so the stock I made from those bones had a very deep, rich flavor. You could also add 1 Tbsp. of duck fat in place of the butter or just butter alone will work, too.

Preparation:
Add all ingredients to a soup pot and bring to a boil. Reduce heat and simmer until potatoes are very tender. Cool completely and then blend until very smooth. 

Soup is so easy to make and nice to have on hand for a quick lunch, starter course, or if the unexpected company arrives!

THAT'S ALL FOR TODAY. 
Julie and Lily say HI!

HOPEFULLY THESE SHOTS FROM IRELAND 
MAKE UP FOR THE LACK OF POTATO SOUP PHOTOS!
Galway is playing Derry this Sunday in the
All-Ireland football finals. We are flying the colors!

UNTIL NEXT TIME...
And here is my humble herb garden
just outside my kitchen door.


www.cookwithcindy.com