Wednesday, February 17, 2021

MORE BEANS PLEASE...THE NEAR PERFECT FOOD!

Since discovering Lesley Sykes new company, Primary Beans (www.primarybeans.com), I have definitely been on a bean kick! After cooking the first pound of Michelet beans I had lots of left-overs to play with. That's one of the many beautiful things about cooking a big batch of beans. I love left-overs! 

First, I made a bean dip, which I served on a lightly toasted crostini with shrimp.


MICHELET BEAN DIP SHRIMP CROSTINI

Ingredients:

2 cups Michelet beans (cooked)

2 Tbsp. freshly squeezed lemon juice

Zest of 1/2 lemon

2 Tbsp. shallots, diced

Large garlic clove, minced

2 Tbsp. Olive Oil

1/4 tsp. liquid smoke (I used Wright's Liquid Smoke-Hickory.)

1/2 tsp. dried sage

Dash smoked paprika. More for topping after bean dip is spread.

Dash cayenne pepper

Salt to taste

8 thin slices baguette

4 shrimp, shelled and cleaned, sliced in half


Preparation:
Saute the garlic and shallot in pan over medium high heat so they get a little crispy. Add all ingredients to a blender or mini food processor and blend until very smooth. 
Crostini is generally made with white bread, such as a simple Italian loaf or a baguette, sliced evenly, and lightly toasted. In Italian, crostina means crusty and crostini means toast.
Spray the sliced bread with olive oil and toast lightly. Cool.
Saute shrimp in the same pan you used to saute the garlic and shallots. Because you have cut them in half they will curl as they cook. Cook until just pink. Cool.
I only made 8 crostini's so had lots of nice left-over bean dip that is great spread on celery or cucumbers. To serve as another appetizer, arrange a platter with various raw veg--red pepper, celery, zucchini, cucumber, etc.--and serve the bean dip in the center of the platter. Nutritious, low-fat, lots of protein, and just plain good!

Another idea with this dip is to serve on the crostini with caviar.

I received this caviar as a gift from my good friend Dorita Joffroy Pina. It is the best caviar I have ever tasted. Regiis Ova (which means Royal Egg in Latin) is a new company founded by Chef Thomas Keller and caviar expert Shaoching Bishop, former CEO of Sterling Caviar and Tsar Nicoulai Caviar. Read about them here: https://www.regiisova.com/about

If you are a caviar aficionada, you will love this caviar. Mild flavor; not at all fishy. Sturgeon eggs are small and delicate. I have been putting this caviar on EVERYTHING! 

I'm going to close today with one more way I turned that original pot of Michelet beans into something different.

SAVORY BEAN PANCAKES
These cakes are similar to a potato pancake or latke, but have that wonderful bean flavor. Next time, I would add 1 Tbsp. of Greek style yogurt to the mix to lighten them up a bit, and then serve with more yogurt and some of that fabulous caviar (which I had not received when I made these!).

Ingredients:
3/4 cup Michelet Beans (cooked)
1 Egg
3 Tbsp. flour
1 Tbsp. finely chopped onion
1 clove garlic, minced
2 Tbsp. parmesan cheese
1/2 tsp. dried oregano
1 Tbsp. olive oil to saute


Preparation:
Slightly beat the egg. With a fork, gently crush the beans leaving them somewhat intact. Add all ingredients together and stir to mix well. To cook the pancakes, heat the oil in a heavy bottomed skillet. I cooked simultaneous with the chicken cordon bleu we had for dinner.

Cook to golden brown, about 5-7 minutes per side. Flip the cakes and finish the cooking. 

BEANS VS. MEAT?
I am a believer in eating from all the food groups. And there are good things about both beans and meat. Beans have more potassium and less sodium than meat. They also are much higher in antioxidants. Meat and bean iron content is identical. Steak has more protein, but also significantly more fat and calories. Beans have tons of fiber. Meat has none. Why not both--eat a small portion of meat with your beans! 

More beans to come, but next time I want to share a recipe for slow-roasted lamb with a pistachio crust that I made for Valentine's Day that was out of this world!
Blustery Valentine's morning constitutional.


UNTIL THEN...

KEEP ON COOKING!

www.cookwithcindy.com


Monday, February 1, 2021

BEANS...BEAUTIFUL BEANS!

My good friend, Karen Syke's daughter, Lesley Sykes started a business last year. PRIMARY BEANS sells beans exclusively; lots of varieties, many of which are organic.  Starting a new business at any time can be challenging, but starting during a pandemic is daunting. Lesley has done it and has done it very well. Take a look at her website: www.primarybeans.com.

Lesley is passionate about beans and set out to provide a high quality product. Each package of beans are labeled with the location where they are grown and also dated so you know that the beans you are buying are fresh. This does make a difference, both in terms of flavor and texture. Old beans are hard. Sometimes they never completely cook.

I decided to try the Michelet bean first as I was not familiar with that variety. Lesley describes these beans as "mild, creamy, delicate". They were all of that and delicious, too! First, I will share how I cooked the beans and, next I will share the recipe I made with the beans. 

TO COOK MICHELET BEANS:
Ingredients:
1 lb. Michelet beans
1 small shallot, diced; about 1/2 cup
2 cloves garlic, diced; about 2 fat Tbsp.
Big sprig of fresh rosemary
1 Qt. Chicken stock (more or less, as needed); preferably rich and home-made
2 tsp. salt
1/2 tsp. freshly ground black pepper
Always rinse beans before cooking and check for any little stones.

Preparation:
I did not pre-soak these beans and they cooked perfectly in about 1 1/2 hours. I am guessing because the beans are fresh they cooked faster. 

Put all ingredients in a saucepan. The stock should cover the beans by about 2 inches. Bring to boil. Reduce heat to low simmer and cook until beans are tender, but not mushy. Check beans as they cook to make sure the chicken stock has not reduced. Add more stock to keep beans submerged during the cooking if it has. Taste and season with more salt and pepper if needed. As they cooked, these Michelet's developed a rich, thick and luscious sauce. I like to cook the whole pound of beans at one time as there are so many different ways to use them. I cooked the beans the day before making this meal.

WILD SALMON WITH MICHELET BEANS, WILTED SPINACH AND MANGO
TOPPED WITH POMEGRANATE DRESSING AND POMEGRANATE SEEDS

TO MAKE POMEGRANATE DRESSING:
This dressing is great on salads and chicken, too! 

Ingredients:
1 1/2 cups pomegranate juice
2 Tbsp. sherry vinegar
1 tsp. Dijon Mustard
2 Tbsp. honey
4 Tbsp. Olive Oil
1/4 tsp. salt. 
Preparation:
Place all ingredients in a microwavable container and zap for about 30 seconds. This helps incorporate the honey with the other ingredients. Shake well. This dressing does separate so you will need to shake each time before using. It's light, refreshing and was the perfect complement to the salmon. You can make this the day before, as well, which means the dinner comes together very easily. I also seeded the pomegranate the day before and peeled, chopped and sliced the Mango. 

I like to make crispy skin salmon. Dry the salmon thoroughly with paper towels and salt both sides. Add 2 tsp. olive oil to a heavy bottomed skillet and heat to high, nearly smoking. 
Cook on skin side only keeping heat high, until salmon cooks through and skin becomes very crispy. These filets are quite thin so it doesn't take long. You can tell it's done when the salmon becomes opaque and a little firm to the touch. Do not overcook! Once the salmon is done remove from the pan and cover loosely with foil to keep warm, skin side up. This keeps the skin crispy.

TO MAKE THE SPINACH AND MANGO MICHELET BEANS:
Ingredients:
1 cup cooked Michelet beans (for 2 servings)
1 clove garlic, diced
1/2 cup Mango, diced
2 large handfuls of spinach
Sliced Mango for garnish

Preparation:
In the same skillet gently add 1 clove of chopped garlic and brown mango slices to use as garnish. Remove from skillet and keep warm. 

In the same skillet, heat 1 heaping cup of the previously cooked Michelet beans. Add 2 large handfuls of spinach, and about 1/2 cup of diced Mango. Stir over medium high heat until the spinach wilts. 
TO PLATE:

First, place about one cup of the bean,
spinach and mango mixture on a plate.
 

Top with salmon, skin side up, and mango garnish.

Next, add the pomegranate seeds and
pour about 2 Tbsp. of Pomegranate dressing over
the dish being careful to avoid the crispy skin. 

Lastly, serve and enjoy!


This sounds like many steps, but if you make the various pieces and parts ahead it really is easy to put together. 

THAT'S ALL FOR TODAY!

NEXT TIME I WILL SHARE ANOTHER RECIPE 
I MADE WITH THESE BEAUTIFUL MICHELET BEANS!

TUNE IN AGAIN SOON...

WWW.COOKWITHCINDY.COM


Friday, January 22, 2021

FROM JUICE FAST...TO BACON WRAPPED PORK!

 I have never been accused of being limited when it comes to food. I like a wide variety and try to continually come up with new and different taste treats. From Crubeens (Pigs Feet) to Rocky Mountain Oysters (Bulls Testicles) to any flavor of Cheesecake and everything in between! I actually have never tasted anything I haven't liked. That said, my husband and I generally go on some kind of a fairly austere diet in January. We have done Paleo, Vegan, South Beach, and many others. It doesn't always last all month, but we usually go 2 or 3 weeks. This year we decided to do a 4-day Juice Fast to kick-start the year. My neighbor and good friend, Lori Itule, once again loaned me her Dad's heavy-duty Champion brand (circa 1950's) Juicer and on January 2 we began. This is a quality piece of equipment and makes Juicing easy.


Ingredients for the Green Drink, which I call Dreamy Greenie!
The coconut butter is to oil the shaft of the Juicer before assembling.

DREAMY GREENIE
Pictured behind the drinks is a beautiful print, which our good friends Steve and Debby Vis gave us after visiting with us in Spiddal, Co. Galway, IRE in the summer of 2019. The artist, Martine Moriarty is from Cork and most of her work is in oils, watercolors, silkscreens, and animation. She primarily paints scenes from around Cork. This one is called The Dingle Hare.

We both like this one for breakfast
as it was very bright, refreshing and
almost gave you a little buzz, like coffee.

The beauty of making Juices is that you can really add any vegetable with some fruit that you like. Dreamy Greenie contains:

Ingredients:
Spinach
Mixed Greens
Celery
Broccoli
Cucumber
Fresh Parsley
Green Apples
Lemons
Ginger Root

Preparation:
Run it all through the high-powered juicer and voila!

Next, my husband, Jerry's favorite...
GAZPACHO
This Juice drink has all the ingredients of Gazpacho soup, except the bread and sherry vinegar. It is really yummy and a perfect lunch-time drink.

Gazpacho on the lefty and Dreamy Greenie on the right.
Ingredients:
Tomatoes, I used lots of Plums
Celery
Green Pepper
Red Pepper
Red onion, small amount
Cucumber
Garlic
Fresh Parsley
Dried oregano
Dash of salt, to taste.

Preparation:
Put all ingredients through the Juicer and you have a Juice version of Gazpacho. Taste and season with a little salt. This really makes the difference!

Next Juice recipe I will share I call...

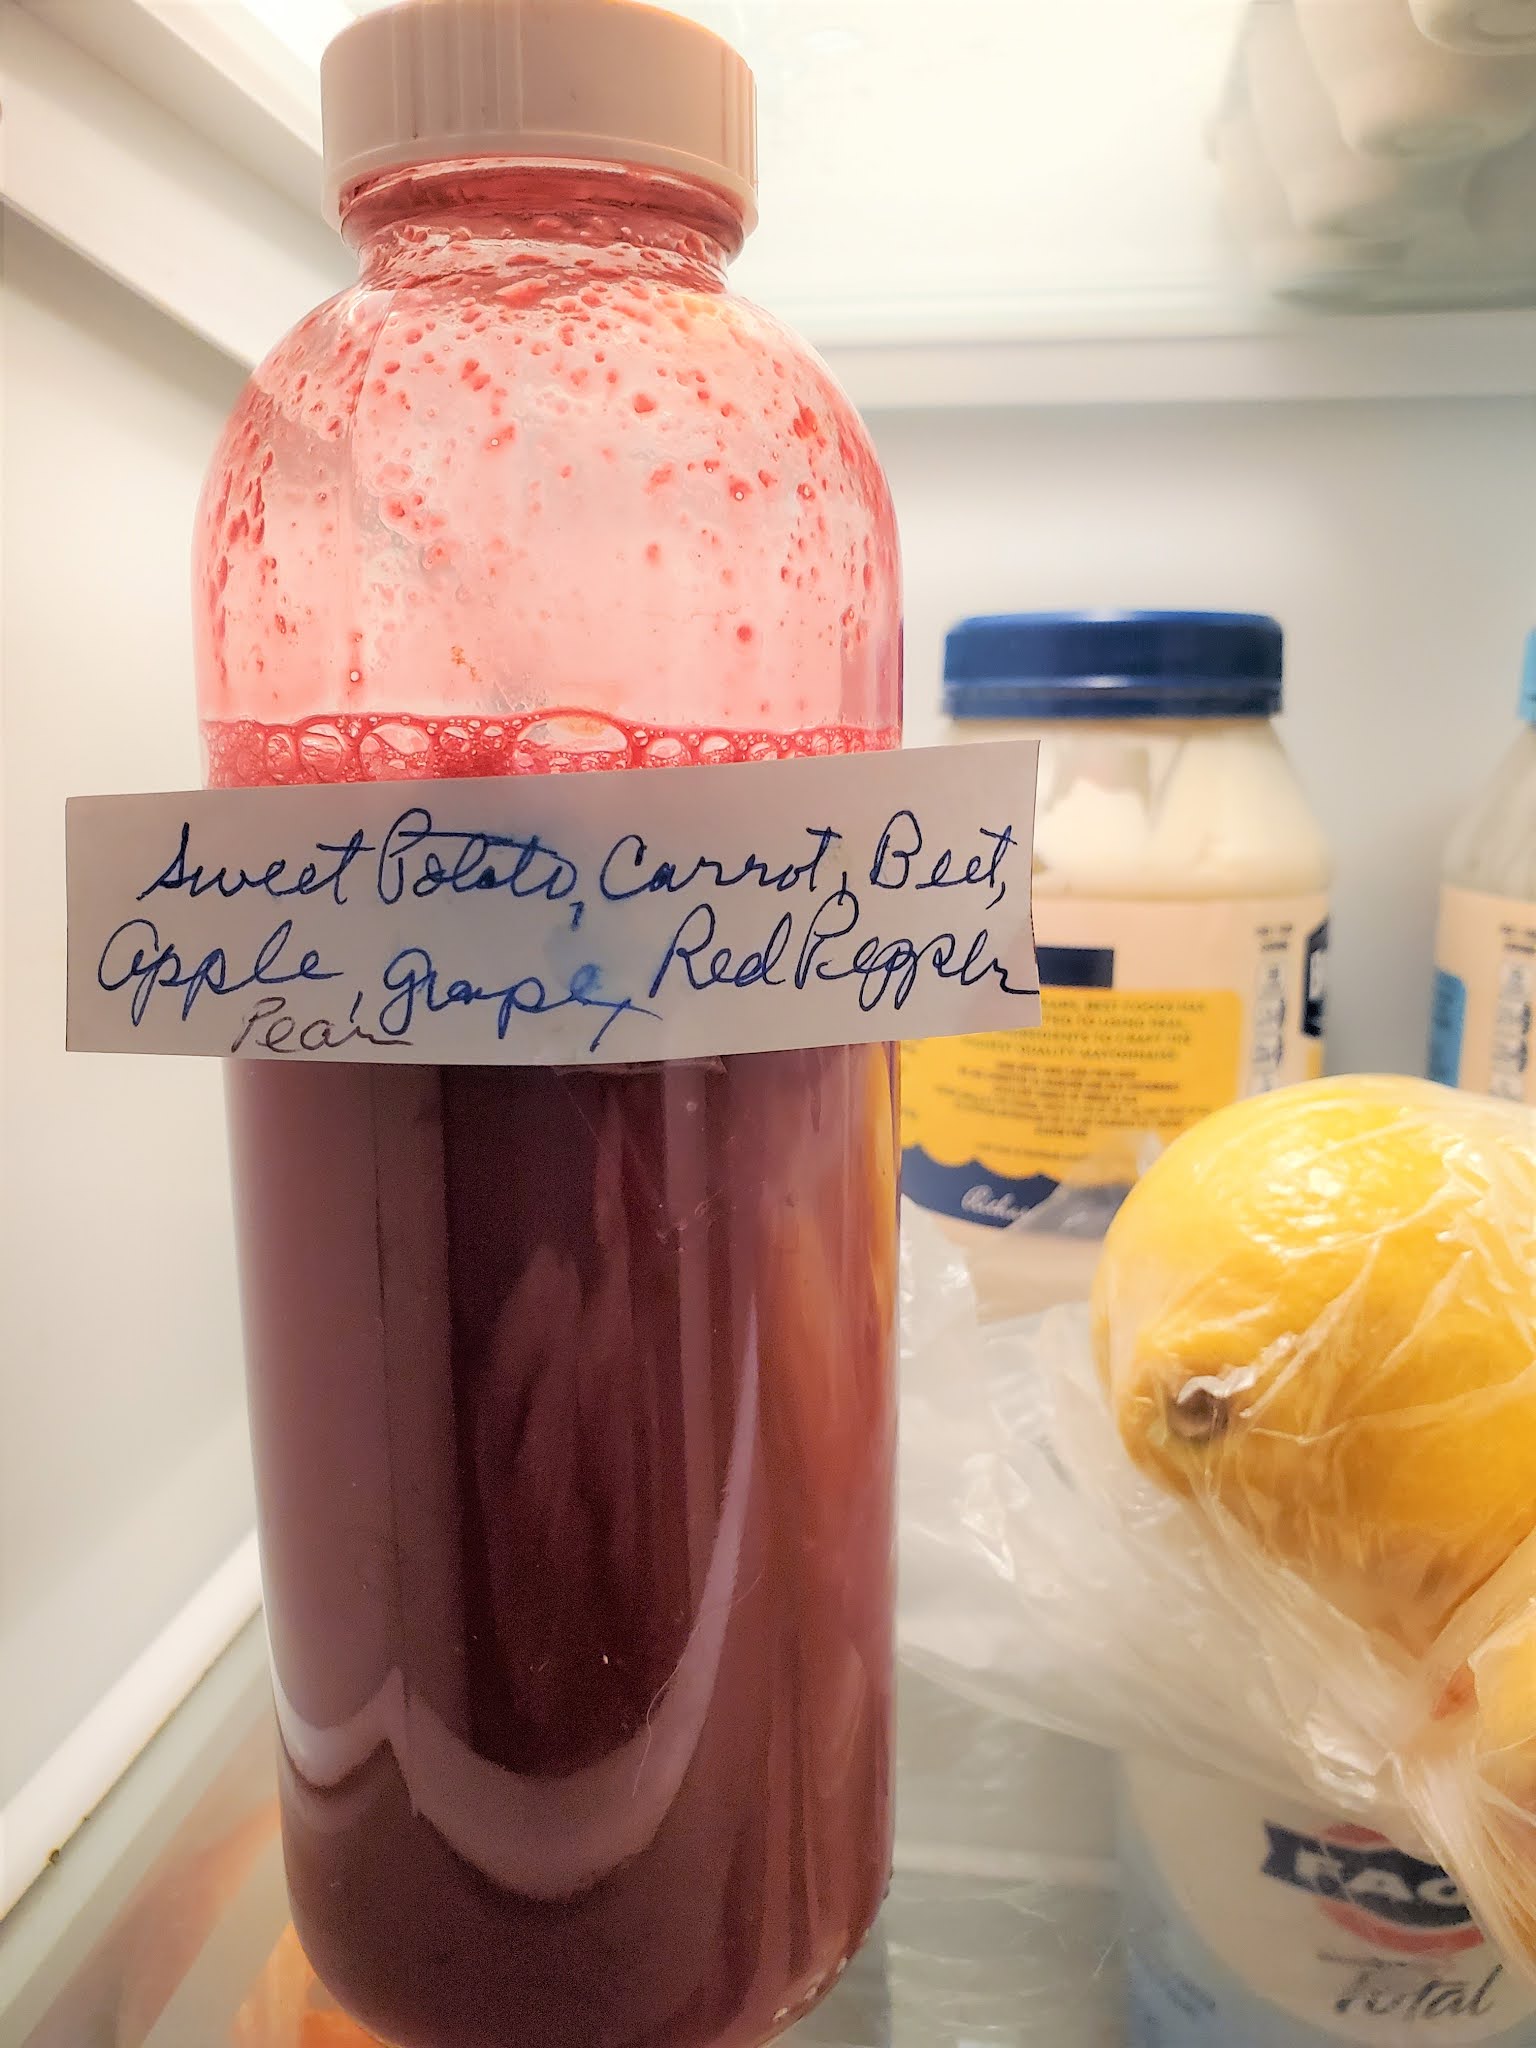
SWEET BEET AND MORE
This drink we had in the evenings as "supper". It is hardy and not really that sweet because of the earthy flavor of raw beets and sweet potatoes, but still quite delicious.

Ingredients:
Beets
Sweet Potato
Carrot
Red Pepper
Red Apple
Red Grape
Pear

Preparation:
Same as above!

And finally, one of my favorites...

SPICY CARROT GREEN APPLE
I love the color of this Juice, as well.
The little bunnies around the Juice are from Hungary.
Each one is hand painted! Since 1826 the Hungarian
porcelain manufacturing company, Herend,
has been producing these exquisite hand-painted creatures
in the signature fish-net pattern.

Ingredients:
Carrots
Green Apple
Ginger Root

Preparation:
Blend all and taste for seasoning. Add more ginger to make it spicier. On one batch I added a very ripe pear, which gave it a little more sweetness, but carrots themselves are inherently sweet so this made a great snack-drink. So simple. So delicious.

Once our 4-day Juice fast ended, we continued to eat a lot of vegetable, but in their full form, both cooked and raw. We slowly added fish, shrimp, chicken and graduated last week to this luscious piece of pork.

BACON WRAPPED, FIG STUFFED PORK TENDERLOIN
Ingredients:
Pork tenderloin
3 Tbsp. Dijon mustard
2-3 cloves finely minced garlic
Sweetened Dried Figs to cover inside of pork, cut in half, stems removed
Bacon to wrap. I used 3 strips of thick-cut bacon
Olive Oil for drizzling in pan
Salt/Pepper
Dried Sage, about 2 tsp.

Preparation:
Preheat oven to 400 degrees. 
Butterfly the tenderloin. Using your sharpest knife, cut through the side of the pork leaving the center intact so you can open like a book; meaning do not cut all the way through. Liberally salt and pepper the inside of the pork. Spread the Dijon mustard evenly over both pork halves. Sprinkle with garlic. Cut each fig in half and place on the bottom half of the tenderloin (fat side is the top). Close the pork, salt and pepper outside of pork and wrap with bacon.

Drizzle olive oil (about 2 Tbsp.) in a cast iron or heavy bottomed skillet. Heat until it's nearly smoking. Brown the bacon and then place in the preheated oven for about 20 minutes or until meat thermometer reads 145 degrees. That is the recommended doneness, but I usually remove once it reaches 140 because #1) I don't like dry pork; and #2) the pork continue to cook once you remove it from the oven. 

THAT'S IT FOR TODAY!
VERY HAPPY TO BE BACK TO EATING REAL FOOD, 
ALTHOUGH THE JUICE WAS GREAT FOR A FEW DAYS!

NEXT TIME I'M GOING TO TALK ABOUT SOME VERY SPECIAL BEANS FROM A NEW AND LOCAL COMPANY, CALLED 'PRIMARY BEANS'.

STAY TUNED...

www.cookwithcindy.com


Thursday, January 7, 2021

CHRISTMAS AND 2020 ARE BEHIND US!

I try always to stay positive, but at times in the last year, that has not been easy. So much loss and sadness for so many families. I pray that 2021 is a better year; a time of healing, both from Coronavirus, and as a nation. 

I want to share a few of our Christmas memories. Once again, my husband and I hunkered down and enjoyed the best of the holiday. We did a lot of eating, listened to Christmas music non-stop, and enjoyed a huge fire every day during the season.

Our cat, JoJo enjoyed those fires, too!

First I want to start with one of my favorite holiday treats...

EGGNOG

Growing up, we made homemade eggnog every Christmas. It's easy to make and tastes quite different from what you buy in the store. It actually tastes like...EGGNOG!

This is not in the dietetic category, but it IS the holidays!

Ingredients:

6 large egg yolks

1/2 cup sugar

1 cup heavy cream

2 cups milk

1/2 tsp. nutmeg

Pinch of salt

1/4 tsp. vanilla 

More nutmeg for topping

Preparation:

Whisk the egg yolks and sugar together in a medium bowl until light and creamy. 

In a saucepan over medium-high heat, combine the cream, milk, nutmeg and salt. Stir often until the mixture reaches a bare simmer.

Add a big spoonful of the hot milk to the egg mixture, whisking vigorously. Repeat, adding big spoonfuls of the hot liquid one at a time to temper the eggs.

Once most of the hot milk has been added to the eggs, pour the mixture back into the saucepan on the stove. 

Whisk constantly for just a few minutes until the mixture is just slightly thickened (or until it reaches 160 degrees). It will continue to thicken as it cools.

Remove from heat and stir in vanilla.

Pour the eggnog into a pitcher or other container and cover with plastic wrap. Refrigerate until chilled. 

Serve with a sprinkle of nutmeg on top.

Store in the fridge for up to one week, but bet it won't last that long!

Many enjoy eggnog with a little rum. I prefer bourbon.

Since I had the homemade eggnog, I decided to make an Eggnog Cheesecake. I had never heard of Eggnog Cheesecake so thought it was an original idea. Of course, when I googled it there were hundreds of recipes. Why invent the wheel. I found this recipe on the Allrecipes site. 

EGGNOG CHEESECAKE

Ingredients:

1 cup graham cracker crumbs
2 Tbsp. sugar
3 Tbsp. melted butter. I used 4.
1/4 tsp. nutmeg

3 (8oz.) packages cream cheese, softened
1 cup white sugar
3 Tbsp. flour
3/4 cup eggnog
2 eggs
1/4 cup bourbon. Original recipe calls for 2 Tbsp. rum.
1 tsp. nutmeg. Original recipe calls for pinch of nutmeg.

Preparation:

Preheat oven to 325 degrees. In a medium bowl combine graham cracker crumbs, nutmeg, sugar and butter. Mix well and press in the bottom of a 9 inch spring form pan. Bake in preheated oven for 10 minutes. Place on a wire rack to cool. I did this the day before and stored in the fridge covered in plastic wrap.
Preheat oven to 425. In a food processor combine cream cheese, 1 cup sugar, flour and eggnog. Process until smooth. Blend in eggs, rum (or bourbon) and nutmeg. Pour mixture into the cooled crust.
Bake in preheated oven for 10 minutes. 
Reduce heat to 250 (I reduced heat to 275. 250 seemed too low.) and bake for 45 -50 minutes until center of cake is barely firm to the touch. Allrecipes recommends removing from the oven immediately. I suggest turning the heat off; opening the oven door and let the cake set in the oven for about 30 minutes. This almost always avoids cheesecake cracking. Remove from oven and let the cheesecake cool completely on a wire rack before removing the rim.
At first, I was disappointed this cake was not thicker, but it really is perfect just as it is. Rich, creamy, eggnoggy and delicious!
I considered topping with whipped cream, but decided that would be gilding the lily so served as is. 
It was a hit with my husband, Jerry!

The next Christmas recipe I want to share is Shrimp Bisque. I decided our Christmas menu was so big and Shrimp Bisque is so rich, that I would serve the Shrimp Bisque on Christmas Eve. I started this recipe the week before by making a luscious fish stock. My dear brother and his wife sent us live lobsters from Maine for my birthday back in the summer. After devouring the lobsters I saved the 'bones' with this bisque in mind. You could use all shrimp shells or a combination of any seafood shells and I think it would be as good, but the lobster lends a very beautiful and unique flavor. Like so many soups you can improvise!

SHRIMP BISQUE


FOR THE FISH STOCK:
2 lobster bodies
4 cups shrimp shells
1 large onion, roughly chopped
2 carrots, roughly chopped
3 stalks celery, roughly chopped
1 garlic clove, smashed
Salt/Pepper
1 bay leaf
Enough water to cover all shells. In a large soup pot bring all ingredients to a rapid boil. Reduce heat and simmer for 3 hours. Strain. 

FOR THE BISQUE:
4 Tbsp. flour
6 Tbsp. butter
1/4 cup very finely diced shallots
3/4 cup heavy cream
1/4 cup half and half
1/2 cup Marsala wine*
3 Tbsp. freshly squeezed lemon juice
1 tsp. Worcestershire
1/4 white pepper, or more to taste
Dash of Old Bay Seasoning
Dash of smoked paprika
4 Tbsp. tomato paste
Salt
1 lb. raw shrimp, shelled and deveined, roughly chopped. Keep 2 shrimp per serving whole for garnish.

Preparation:
In a large pan melt 6 Tbsp. butter. Add shallots and saute until soft. Whisk in flour and continue cooking over medium heat until the roux becomes golden brown; about 5 minutes.  
Slowly add 2 1/2 cups of fish stock to the roux, whisking constantly to ensure that it stays smooth.
Whisk in 4 Tbsp. tomato paste. Add creams, Marsala, lemon juice, Worcestershire, pepper, salt, Old Bay, and smoked paprika. Taste for seasoning and adjust accordingly. Add both the whole and chopped shrimp and cook over low simmer until shrimp just turns pink; about 7-10 minutes. Garnish with the whole shrimp. Chives or chopped fresh tarragon would add a nice garnish, as well.

*You do not need a fancy or expensive sherry or marsala, but please do not use cooking sherry. This is what I use.

This is one of my favorite soups! 
I'm going to close today with a few more photos from our Christmas...


Deviled Eggs and Polish ring always appeared at Christmas Eve growing up.
We would not have had smoked salmon with mascarpone cheese garnished with green olives!


The traditional Peppermint Stick Ice Cream.


JoJo enjoys doing jig saw puzzles. So does his Mama!


Christmas morning sunrise.

LOOKING FORWARD TO MORE JOY, HEALTH 
AND HAPPINESS IN 2021!

...AND, MORE COOKING!

HAPPY NEW YEAR!

www.cookwithcindy.com

Monday, December 21, 2020

PINA COLADA TRES LECHES CAKE!

 Last year I made this cake for my dear friend, Joyce Prim's birthday, and this year she requested it again. One of the things that makes me happiest is pleasing people with food so I was thrilled she wanted the cake again on her special day.

Happy Birthday Dear Joyce!

This cake is basically a traditional Tres Leches cake, but with the addition of coconut milk for one of the tres milks, pineapple, a little rum, and topped with toasted coconut to give it a Pina Colada flavor. It really should be called a Cuatro Leches cake because by the time you frost with whipped cream you have 4 milks, not 3, but who's counting. It's darn delicious!


Ingredients:

FOR THE CAKE:

1 1/2 cups flour

1 Tbsp. baking powder

1/2 tsp. salt

6 large eggs, separated

1 cup white sugar

1/2 cup unsweetened coconut milk, Shake the coconut milk vigorously before you measure it out.

1 tsp. vanilla extract

1 Tbsp. rum

1 cup canned crushed pineapple chunks, slightly drained

FOR THE LECHES:

1 cup unsweetened coconut milk

1/2 cup sweetened condensed milk

1/2 cup evaporated milk

1 tsp. vanilla

6 Tbsp. rum

FOR THE WHIPPED CREAM FROSTING:

1 1/2 cups heavy cream

1/4 cup white sugar

1/2 tsp. vanilla 

1 Tbsp. rum

1 1/2 cups sweetened coconut, toasted

Preparation:

TO MAKE THE CAKE:

Preheat oven to 350. Generously grease a 9x13 inch baking pan.

Combine the flour, baking powder, and salt in a bowl. Set aside.

In the bowl of a stand mixer fitter with a whisk attachment, beat the egg yolks and sugar on medium high speed until thick and pale in color, and falls in ribbons when you lift the whisk, about 5 minutes. You can also do this with a hand mixer, but the standing mixer makes it much easier. 

Stir in the coconut milk, vanilla, and rum. Gently fold in the flour mixture.

In another mixing bowl, beat the egg whites on medium high speed to soft peaks. Gently fold the egg whites into the rest of the batter in 3 additions. Stir in half of the pineapple chunks.

Pour the batter into the prepared sheet pan, Sprinkle the remaining pineapple on top of the batter. Bake until cake is golden brown and the center bounces back when touched gently, about 30 minutes. Let cool completely.

TO MAKE THE LECHES:

Combine the coconut milk, sweetened condensed milk and evaporated milk. Add the vanilla and rum.

Use a skewer or fork to very gently poke holes in the cake, pressing them all the way down to the bottom. This allows the 3 milks to penetrate the cake. Pour the leches mixture over the cake, careful to cover it all. It will be quite goopy. Cover with plastic wrap and chill in the fridge for at least 3 hours or overnight. it takes time for the cake to drink up all that milk!

TO MAKE THE TOPPING:

Whip the heavy cream until it starts to thicken. Add the sugar, vanilla and rum, and whip to soft peaks. Spread the whipped cream on top of the cake. Top with toasted coconut. 

It was a happy, joyous celebration. Wishing you many more Mrs. Prim! I greatly look forward to the next birthday celebration!

This will be my last blog of 2020.

MERRY CHRISTMAS

 FROM THE HEART AND SOUL

 OF MY KITCHEN TO YOURS!


www.cookwithcindy.com