Saturday, August 24, 2013

JO JO TURNS 1!

Our kitty Jo Jo officially became a cat on August 8th when he celebrated his first birthday. We felt it appropriate to have a little occasion for him. I made a small kitty cake, he wore a party hat, much to his chagrin, and he had his first catnip. I think that was the part he liked best! It sure was fun to watch him race around!
He was so excited about the party that he did not eat his cake until the next day. Here is the recipe...
 
JO JO'S BIRTHDAY KITTY CAKE*
Ingredients:
1/2 cup dry Purina (or your cat's favorite brand), ground in blender, mini-max or food processor
2 eggs, slightly beaten
1 tsp. soft ground food (not chunky)
1 tsp. catnip

Preparation:
Mix all ingredients and pour into greased custard cups. This makes 2 custard cup size cakes. Bake at 350 degrees in preheated oven for 15-20 minutes.

Jo Jo went crazy when I first took the cakes out of the oven. The kitchen was filled with the delicious aroma of rich grain mixed with a little fishiness!
*This would work equally for a puppy party, but not sure about the catnip!

OK, enough of that...on to something a little more useful. As some of you who follow this blog know, I have been on the South Beach diet for a couple months now. It is definitely changing my cooking expression, but I am loving it. This is not to say I will stop cooking crazy things like Triple Bourbon Pork Chops, but recently we've had mainly a lot of veg and lean protein. Here's a South beach dessert I tried the other day that was easy, delicious and refreshing on a hot summer night.

LEMON BUTTERMILK SORBET

Buttermilk Lemon Sorbet-2
If you enjoy the flavor of lemon and like the tanginess of buttermilk, this sorbet will be a hit. It has just 3 ingredients and takes no time to put together, although you will need an ice cream freezer.

Ingredients:
2 cups buttermilk, reduced-fat
2 medium lemons; zested (use all the zest) and juiced (use just 3 Tbsp.)
2/3 cup agave nectar

Preparation:
In a large bowl, whisk together the buttermilk, lemon zest, lemon juice and agave nectar. Chill in fridge for 4 hours and then freeze in an ice cream maker according to your manufacturer's instructions. In my Cuisinart that means about 25-30 minutes. Place in freezer until ready to serve. Garnish with lemon twists or mint leaves. Next time I am going to add a cup of blueberries before freezing.

I met a lovely woman at a car show a couple weeks ago who gave me a great tip for freezing Basil Pesto. Thanks Marty! Once you make the pesto, pack it into ice cube trays. Press the pesto down into each cup, level off and freeze. When the basil cubes are frozen drop them into a zip lock bag. In this way you take out just exactly what you need to use. Very handy for instant bruschetta, pasta with pesto and shrimp, pasta e fazioli, pizza, and on and on and on! Basil pesto freezes very well for up to 6 months. If you have a big basil crop you can enjoy pesto all winter long. One year my Mom grew basil thinking she would like pesto. Turns out she didn't like the flavor and I ended up with 17 lbs. of basil. That made a lot of pesto. My fingers were green for weeks! Here's a pesto I put together last night on grilled chicken.

HERB PESTO

Ingredients:
2 Big handful basil leaves (I used both regular and Thai basil.)
2 sprigs rosemary-leaves taken off the stem
Chives to make about 1/3 cup
1/2 cup parmesan, asiago, or 4-cheese blend (I used the 4-cheese because that's what I had on hand!)
1/2 cup olive oil
1 Tbsp. mayonaise (I would not normally put mayo in basil pesto, but it seemed like the right thing to do here.)
1/4 cup almonds (Traditional pesto uses pine nuts, but walnuts work well, too and are less $$.)
1 large clove garlic, peeled and smashed
Salt
Preparation:
Blend the herbs in a food processor or mini-max until well chopped. Add all other ingredients and blend until you have the right consistency. Adjust salt.
 
Pesto can be made with any combination of herbs, nuts, olive oil, cheese and garlic. Get creative and have fun with it.
 
I served the BBQ'd chicken with fresh steamed summer squash from Teri's Farm Stand and grilled eggplant, also from Teri's, topped with homemade red sauce and a bit of cheese. I marinated the chicken in a reduced fig balsamic glaze before grilling.
 
 
I'm going to finish up today with a couple very refreshing summer drinks suitable for all ages.
 
CUCUMBER WATER

 
My sister-in-law, Esther, turned me on to this drink. Thanks Esther! Just add cucumber spears to a pitcher of ice water. I used a whole large, peeled cuke for this pitcher of water. Chill in the fridge for about an hour and you will have a very surprising cucumbery drink!
 
And last...
 
PEPPERMINT WATER
I have started experimenting with essential oils thanks to my friend Diana who introduced me to the medicinal and culinary benefits of using them. Thanks Diana! The best, most pure oils are doTerra Oils (www.doterraoil.com). Place 1-2 drops of Peppermint essential oil into 16 oz. of water. Shake and chill. Unbelieveably delicious!
 
That's all for now.
Thanks so much for joining me fellow foodies
for another adventure of

Hey, even the cook gets to enjoy a little R&R at the beach during the dog days of summer!


Sunday, August 11, 2013

BANANA LEAF COOKING!

FILLET OF SOLE STUFFED WITH CRAB
WRAPPED AND GRILLED IN BANANA LEAF

I recently went to a local food produce stand here in America's home town, and mine, Plymouth, MA and Teri had giant banana leaves sitting on the floor of her ever so cute little veg-shed. She ended up giving me a leaf (as I was out of money since I bought so much wonderful stuff!) and I told her I would write about it in my next blog. What a blast it was to cook fish on the grill wrapped in banana leaf...a-w-e-s-o-m-e! ...and very easy. It made me feel quite cheffy! I know I talked about fillet of sole last time, but we eat a lot of fish and sole is one of my favorites. And last time we did not wrap it in banana leaf!

Teri also sells fabulously fresh hen and duck eggs, all kinds of vegetables, freshly cut flowers, and beautiful driftwood sculptures she creatively makes herself. Check her out on Facebook. Invite Teri Payne Snyder to be your "friend" and she will invite you to her Farmstand Group.
First, here is the leaf which was about 3 feet long. Next, I cut it into roughly 12" x 12" squares to wrap my fillet of sole into.


Here is the sole after being cooked.

I stuffed this sole with crab meat (about 1/2 lb. for 4 fillets or use good quality canned crab) mixed with about 2 Tbsp. of mayonaise, 1/3 cup bread crumbs, and a squeeze of fresh lemon juice, a little salt, pepper and the stuffing was complete. Drizzle the sole with olive oil, salt, pepper  and a little more freshly squeezed lemon juice. Put about 2-3 (depending on how big your fillets are) Tbsp. of the crab into the center of each fillet. Roll up gently and then wrap them in the banana leaves. Think: Christmas or gift package. Gently roll folding each side and then tie with kitchen string. You may have crab left over, but that is not a bad thing! This makes a great stuffing for mushrooms.
Can you see how much fun I have playing with food?!?!
 
Get your grill on high and drop each package onto high heat for about 4 minutes per side.


Tender, juciy, and incredibly flavorful, these banana leaves kept all the juices in and made for a very interesting and fabulous meal. Thank you Teri! Wonder what other leaves you could wrap food in?

This reminds me of when my husband, Jerry and I were in Fiji about 20 years ago...On our last festive night in that spectacular part of the world, we had a meal that was cooked wrapped in some kind of leaves (possibily leaves from a giant coconut palm tree), buried underground and cooked for hours in a bed of hot rocks. I remember it was some kind of fish and veg. When they unearthed it, it was coated with soot and dirt and who knows what else, but in any case, NOT good. We all tried to be gracious because this was a traditional way of cooking, but even ME who likes almost everything had a bit of a hard time. It took a lot of kava to get that meal down. My poor husband, whose tummy is delicate got horribly sick on the 14 hour flight home. My general rule of thumb when traveling, regarding food...no matter what! GO FOR IT!

Here's an interesting veg I also got from Teri's Farm...
PURPLE BEANS


You may be familiar with these beans, but I was not. They taste almost exactly like green or yellow wax beans, but the amazing thing is when you cook them they become green again. I love the transformation! They are also great sliced and raw in salads. When you cut into them, their centers are green making a very attractive presentation.

Traditional green beens on the left and the purple beans on the right. See the difference?!?! Right, no difference when cooked!

Our kitty cat, Jo Jo just had a birthday. He turned 1 last Thursday. I made him a special birthday kitty cake and we had a little celebration for him. You will hear about those festivities next week along with some other tips and a suggestion for freezing basil pesto I just learned about this weekend from a new friend I met at a car show!

UNTIL THEN MY FRIENDS,
THANKS FOR JOINING ME.
 
TUNE IN AGAIN SOON FOR ANOTHER EPISODE OF:


Here I am with my sister-in-law Chickie wearing my new Rabbitt's Kitchen birthday apron. What a wonderful and thoughtful gift dear Chickie. Thank you!

Saturday, July 27, 2013

SUMMER MEANS SUN TEA!

 
Making Sun Tea is easy and the variations are endless. I like to put anywhere from 5-6 different bags together depending on how strong you like the tea and what type of tea you use. I generally mix different herbal teas together. My favorite: Bengal Spice, Mint, Licorice and then I add 3 Earl Greys. Fill your container with water from the tap and put the tea outside in the sun for a few hours or even all day. If you don't have a big glass jar, a glass pitcher covered with foil works fine. Serve over ice with lemon, mint or even a big sprig of basil.

My husband, Jerry and I have been on the South Beach diet for the last month which has somewhat cramped my cooking style. We are eating tons of fresh veg and fish or chicken and I just wasn't sure most of these meals were blog-worthy, but since this is what we are eating I am going to share the last couple of dinners. The good news is we have each lost 15 pounds. 10 more to go and then back to a little more creative cooking, but we are both truly enjoying our new diet...and waistlines!
 
FILLET OF SOLE STUFFED WITH SHRIMP
SERVED OVER A BED OF WILTED SPINACH


We had our neighbors over for dinner the night before last and I made little triangles of puff pastry stuffed with shrimp and caramelized onion. Yum! Yum! Definitely NOT South Beach, but you do have to go off occasionally. Having the shrimp stuffing already prepared made this dish fast and easy to put together. Here is how I made the stuffing.
Ingredients for stuffing:
1/2 large vidalia onion, sliced
2 Tbps. Olive Oil
1 Tbsp. Butter
Salt/Pepper
About 10 shrimp, peeled, deveined and chopped

I love kitchen gadgets and this cute little fork, actually called a Crab Zipper, is perfect for cleaning
and deveining shrimp. Thanks Francine! What a thoughtful gift!
Preparation:
Heat Butter and Olive Oil in frying pan to medium high. Add sliced onions. Reduce heat to low. Cover and simmer for about 40 minutes until onions get golden brown, very soft and sweet. Add chopped shrimp and cook until shrimps turn pink; about 5-7 minutes. Taste for salt and pepper.

To make the hors d'ouevres, cut puff pastry into 3 inch squares. Drop 1 Tbsp. of shrimp/onion mix and fold the pastry in half to form a triangle. Pinch edges. Brush top with egg wash (1 beaten egg with 1 Tbsp. water--you will have leftovers here, too which can be used in the mornings scrambled egg.) Bake in 400 degree preheated oven for 12-15 minutes. Back to the fish...


To make the Fillet of Sole over Steamed Spinach...
Heat oven to 375 degrees. Add 2 Tbsp. butter and 2 Tbsp. Olive oil to a frying pan. Bring pan to high heat. Rinse a bag of spinach and drop into the pan and stir for a few minutes until spinach is just barely wilted. Salt/Pepper. Take off the heat. Place a couple Tbsp. of shrimp/caramelized filling in the center of each piece of fish, roll up. Spritz with the juice of 1/2 lemon. Top with chopped chives. Place the fish on top of the wilted spinach and cook in oven no more than 10 minutes. We made an impromptu sauce using ketchup (homemade-see previous recipe in this blog); mayo, a little horseradish mayo, 4 drops Lemon Essential Oil, a couple drops hot sauce, Salt, Pepper, fresh thyme. Heat for about 20 minutes to thicken.

I am going to close with a couple shots of some shrimp and veggie skewers we had the other night.

I usually let the cut up vegetable, in this case, zuchinni, summer squash, 2 types of mushroom, baby sweet peppers, vidalia onion, marinate for a few hours in olive oil and a Victoria Taylor spice mixture called Tuscan Seasoning. Salt/Pepper. Marinating in a zip lock allows you to keep turning so all the vegetables benefit from the marination.
                                                             
 
I also grilled an eggplant. The next day these veg are great on a salad or work well in an omelet.

Tomorrow is my birthday and my husband is treating me by cooking for me! I have requested grilled steak, since we so rarely eat it (even when we're NOT on South Beach!) with blue cheese-butter, grilled asparagus and a roasted beet salad with feta cheese and candied pecans. I cannot wait!

I LOOK FORWARD TO TALKING WITH YOU AGAIN SOON. THANK YOU FOR TUNING IN
TO ANOTHER EPISODE OF:


ENJOY THESE BEAUTIFUL SUMMER DAYS WITH LOTS OF OUTDOOR COOKING AND DINING AL FRESCO!

Sunday, June 30, 2013

TRIPLE BOURBON PORK CHOPS

I made these double-thick grilled chops recently for a father's day celebration with my husband and 2 boys. There are a fair number of steps to preparing them, but what a fun labor of love this was...and very worth the effort as they were scrumptuous. I started in the morning by making a Bourbon Brine.
I served the Bourbon Chops with a light spinach soufle and grilled sweet baby peppers and Vidalia onions.
BOURBON BRINE
You can brine chicken, turkey, pork or just about anything. Brining helps meat retain its juiciness and makes the meat much more tender and succulent. I brine my turkey every year at Thanksgiving. What I think is fun about making brine is once you have the basic proportions of salt to water you can add any seasonings, herbs or veg to flavor your brine. The basic balance is a gallon of water (or mix in other liquid-apple juice, cranberry, wine, etc.) to 1 cup of salt (regular table salt with no Iodine or other additives). If you are using Kosher salt, which is more expensive and not necessary, you will need a little more. My rule of thumb is to brine 1 hour per pound of meat or poultry. I brine a turkey overnight, but pork chops only need a few hours. Here's the recipe.
Ingredients:
1 cup water, brought to boil
3/4 cup salt
1/4 cup maple syrup
1/2+cup Bourbon
4 star anise
2 cinnamon sticks
3 additional qts. water
Preparation:
Bring 1 cup water to boil and add all other ingredients. Stir to dissolve salt. Remove from heat. Cool or chill in the freezer to get it cold faster before moving on. Once chilled, add 3 qts. water. I brined the double thick pork chops in a zip lock bag in the fridge for about 7 hours, which is more than they needed, but does no harm. Brining in a bag works well because you want to make sure every part of the meat is submerged. Double-bag to avoid any seepage or spills. I had about 2 cups left over brine which I froze. (Do not re-use brine once you have brined your meat.) Turn the chops every 1/2 hour or so.

On to the chop preparation...

Rinse chops thoroughly to remove excess salt. Pat dry and let sit in the fridge for an hour to completely appreciate all the goodies from the brine. These chops have had a lot of Bourbon!

Remove from fridge and let come to room temperature for about an hour before grilling. I grilled over a very hot hardwood fire reduced to a good bed of coals. While the chops are coming to room temp, make your bourbon glaze.
BOURBON GLAZE

Ingredients:
3 Tbsp. Olive Oil
2 Tbsp. Butter
3/4 cup Bourbon
2 Tbsp. Maple syrup
Preparation:
Heat Olive Oil and butter in a saucepan until bubbly. Very carefully add Bourbon. Give the pan a gentle shake to flame up. Gentle is the key here. You do not want to spill the liquid onto your (in my case) gas stove. Let the flame burn off for 30 seconds or so and then very gently blow on the flame to put out. By flaming you burn off the alcohol so the glaze does not taste like pure bourbon.
This makes me feel very cheffy!
Once the fire is out, reduce heat and add 2 Tbsp. maple syrup. Cook very slowly to reduce by about 1/2 or until you get desired thickness for glazing the chops as they are grilling. Let cool completely on the counter at room temp.

Next, make the Bourbon mushroom cream sauce.
BOURBON MUSHROOM CREAM SAUCE
Ingredients:
1 Tbsp. Olive Oil
2 Tbsp. Butter
4 white button mushrooms, sliced
4 babyPortabella mushrooms, sliced (--Or any mushrooms you like to make about 1/2 cup sliced.)
3/4 cup Bourbon
For the Roux:
1 Tbsp. Butter
1 Tbsp. flour
1 Tbsp. Bourbon
1 cup light cream
Heat butter, add flour, cook until you have a nice thick paste. Add Bourbon and about 1/4 cup of the cream. Keep stirring so consistency is smooth and creamy. Keep adding cream a little at a time until thoroughly blended.

Preparation:
Saute mushrooms in Olive Oil and Butter over medium high heat for about 5 minutes until mushrooms start to sweat. Add Bourbon very carefully as it will flame up again. As with the glaze let it flame for under a minute and then blow out the flame. Reduce heat to low. Continue sauting over low heat for about 5 minutes.

Next, add the roux to the sauting mushrooms and stir gently. Keep stirring over low heat until you get the desired thickness for a creamy sauce. If it gets too thick add a little more cream (or Bourbon!). Remove from heat. Re-heat when ready to serve.

I had the butcher at my local grocery store cut these pork chops to almost 2" thickness. Chops do not take long to cook and can over-cook easily which is why the brining helps to keep them moist. Start with a clean grill. Spray your grill (whether charcoal, wood, or gas) with PAM. Brush the chops, both sides with the glaze. I grilled these chops about 2 minutes then turned clockwise to get the cross-hatch grill marks and grilled another 2 minutes. Glaze again. Turn the chops over and repeat for a total of 8 minutes grilling time. Glaze again generously. Turn your heat as low as you can and cover the grill and let set another 5 minutes. This gives the chops a very lovely smokey flavor and finishes the cooking. Take them off the grill and let them rest for 10 minutes while you get the rest of the meal together. The chive blossom is optional. My grill just happens to be next to my herb garden and the chives were in bloom and looked pretty. I also added the blossom to the plate when serving because no matter what you do to a cream sauce, it does not always look very pretty, but this sure was a Bourbonliscious treat!
 
Wishing everyone a very happy, festive, wonderful 4th of July!
I will be in NH with my family for the 4th grilling Blue Cheese Stuffed Hamburgers flavored with Smokey Chipotle.
An old fashioned potato salad and cole slaw
made with Chinese Cabbage, dried cranberries and scallion will complete our cookout.
My mouth is watering...
 
Thanks again for allowing me to share my
Triple Bourbon Pork Chops!
 
Tune in again soon for another episode of:


Monday, June 17, 2013

GRAPENUT PUDDING

A classic New England favorite, I have been loving Grapenut Pudding all my life. This is the dessert I made with Kathe Rabbitt the other night to complete our Blue Plate Special Meatloaf extravaganza. It goes together very easily and if you serve without ice cream or whipped cream is actually quite healthy!  Hint: It's better with the topping!
GRAPENUT PUDDING

Ingredients:
1 quart milk, scalded
1 cup Grape-Nuts cereal
4 large eggs
Scant 1/2 cup sugar
1 Tbsp. vanilla (Sounds like a lot, but is the right amount.)
Pinch of salt
1 Tbsp. unsalted butter
1/2 tsp. nutmeg
Water for the hot water bath.

Here's Kathe popping the Grapenut pudding into the oven.
Preparation:
Heat oven to 350 degrees. In a medium-sized bowl pour scalded milk (To scald the milk, heat in a heavy bottomed pan over medium heat until a skin forms. Pull off skin with your fingers and discard.) over Grape-Nuts and let sit 5 minutes. Add 1 Tbsp. butter to the milk so it melts. In a second medium-sized bowl, with a whisk beat eggs, sugar, vanilla and salt. Add the egg mixture to milk and Grape-Nuts and stir well.  Pour into a buttered 2 quart casserole dish. Generously grate nutmeg over the top (or use ground nutmeg). Place the casserole into a deep roasting pan. Place in the oven and pour water into the roasting pan enough to reach halfway up the side of the casserole. (This gives the custard a soft, creamy texture.) Bake 45-60 minutes until almost set in the center (custard still has a slight jiggle). Serve warm, at room temperature, or completely cooled with either whipped cream or vanilla ice cream.

Here's another dessert I made recently for my brother's birthday which also calls for Grape-Nuts. This healthy treat is easy to make, looks elegant and tastes yummy.

WALNUT RASPBERRY CHEESECAKE
Ingredients:
For the Crust
1/3 cup Grape-Nuts
3 Tbsp. chopped walnuts
1/2 cup mini Chocolate Chips
1 Tbsp. butter, melted
1/2 tsp, freshly grated lemon zest
Dash of cinnamon

For the filling
Preheat oven to 300 degrees.
Filling ingredients:
1 cup 2% cottage cheese
4 oz reduced fat cream cheese
2 Tbsp. sugar (Next time I would use 3 Tbsp.)
1 large egg
1 Tbsp. cornstarch
1 tsp. finely grated fresh lemon zest
1/2 tsp. vanilla
40 raspberries
Preparation:
Make the crust: Pulse crust ingredients in a food processor or mini-max until crumbly, but moist. Melt 1 Tbsp. butter, add to the crumbs and mix well. Lightly oil or butter 5 custard cups. Divide crust mixture among the cups and firmly press into an even layer on bottoms.

Make filling and bake cakes:  Puree cottage cheese in food processor or blender until completely smooth. Don't give up on it. The texture will be completely transformed. Add the remaining ingredients. Scrape down sides several times so the mixture gets very creamy. Spoon into custard cups.  Press 8 raspberries into the top of each cheesecake. Bake in a hot water bath (same as above recipe) until firm, 20-25 minutes. Cool on rack. Chill covered for at least 2 hours.

Variations on this cheesecake are endless...strawberries or blueberries. A spoonful of either raspberry, strawberry or blueberry jelly swirled through the cake. Or bake the cheescakes without fruit and top with fresh kiwi's, etcetera, etcetera!
Here's my big brother getting ready to blow out the candles
while his dear wife, Esther and their dog Rosy cheer him on!
HAPPY BIRTHDAY SKIP!


Thanks for tuning in again for another episode of:
 
 
Let me know if you're enjoying the new "lighter" version of my blog.
 
 
Next time I will share a recipe for double thick pork chops brined in bourbon, grilled with a bourbon glaze and served with a bourbon cream sauce!


Wednesday, June 5, 2013

BLUE PLATE SPECIAL!

Recently cousin Joe and his wife Kathe joined us for dinner. Kathe wanted to Cook With Cindy and together we made a spectacular, but very humble meal.

MEATLOAF
 
The term Blue Plate Special has been around since the late 1800's, but gained popularity during the Depression through the 1950's at restaurants, especially diners, around the country including Shoney's! The term is used for a large portion of very inexpensive, hearty food that was served in a 3-section disposable Blue Plate. My husband bought me this plate especially for our dinner with Joe and Kathe.

Ingredients:
3 Tbsp. Olive Oil
2 yellow onions, peeled and diced
2 cloves garlic, peeled and diced
3 lbs. ground chuck (I used 2 lbs. of regular fatty and 1 lb. of lean)
1 8-oz. can tomato sauce
1 egg, lightly beaten
1 cup fresh breadcrumbs (I also added about 1/2 cup Panko crumbs as it seemed too loose.)
Salt/Pepper
3+ Tbsp. Homemade ketchup

Preparation:
Heat oil in a medium saute pan over low heat. Add onion and garlic and cook until soft, about 15 minutes. Remove from heat and allow to cool.
Preheat oven to 350 degrees. Combine ground chuck, tomato sauce, egg, bread crumbs, half the onion and garlic mixture, and salt/pepper to taste (Yes, I do taste raw beef and as some of you know steak tartare is one of my favorites!), in a large bowl. Stir with your hands just enough to mix. Do not over-mix.
Place the meat in a 3"x11" loaf pan (I did not have that size so used a regular bread pan and had enough to also fill a mini bread pan.) and mound the top with your hands to form a crown.
Kathe is about to pop that loaf in the oven!

Top with remaining onion-garlic mixture and drizzle with ketchup. Bake for 45 minutes. Remove from oven and let stand for 10 minutes for easier slicing.

KETCHUP


I have never made ketchup before, but now cannot imagine buying it. So easy, so good, and so much less sugar! This recipe makes about 3 cups and lasts in the fridge for up to a month.

Ingredients:
1 28-oz. can tomato puree
1 medium yellow onion, peeled and quartered
1 clove garlic, crushed and peeled
1/2 jalapeno, seeded (I did not have a fresh jalapeno so used about 1/4 tsp. dried hot pepper.)
2 Tbsp. dark brown sugar
1/2 cup cider vinegar
Pinch of cayenne; celery salt; dry mustard; ground allspice; ground cloves; ground ginger; and ground cinnamon
Salt/Pepper to taste

Preparation:
Combine tomato puree, onion, garlic, jalapeno, and sugar in a blender or food processor. Pulse until blended, then add vinegar and 1 cup water and puree until smooth. Transfer to a medium saucepan and add all other ingredients.

Cook, stirring occasionally, over low heat for 45 minutes. Taste and adjust salt and pepper. You will never buy Heinz again!

For dessert we had old-fashioned New England grapenut pudding served warm with whipped cream.

Two of my most loyal blog followers have suggested I might make my blogs a little shorter. We are all so busy that I agreed with them completely so this is the first of a shorter version of Cook with Cindy. Next time I will give you the recipe for grapenut pudding.

I love cooking with friends and family and look forward to many more delightful experiences in the kitchen.
 
Until next time, enjoy your time in the kitchen.
 
FOOD IS LOVE!

These knives belonged to my husband's grandfather who was a chef in Falmouth, MA on the Cape.
Big, sharp knives are very empowering!
LOOK FOR ANOTHER TRIMMED-DOWN EPISODE OF
COMING SOON!

Thursday, May 9, 2013

CAKE FOR THE ANGELS!

It is believed that Angel Food Cake got its name because it is so light and airy--A cake light and feathery enough for the angels. I have just discovered a local fresh egg source (both hen and duck eggs) so have been having some fun with fresh eggs. Angel Food Cake is almost all egg white and ice cream is almost all egg yolk so it makes sense to work the two together. When we were kids, Angel Food Cake was always the Birthday cake of choice. In fact, there really was no other choice. It WAS the birthday cake. The only other decision around birthday meals was to select your birthday dinner and my Mom would make whatever we chose.

Here is the cake right out of the pan. It doesn't matter that it looks a little mottled as you will either frost it (traditional birthday treatment) or as I did in this case, top with homemade vanilla ice cream, rich chocolate sauce (homemade by my neighbor) and strawberries!
 
ANGEL FOOD CAKE
Ingredients:
1 3/4 cup sugar
1/4 tsp. salt
1 cup cake flour (I used regular white flour.)
12 egg whites (room temperature)
1/3 cup warm water
1 tsp. vanilla
1 1/2 tsp. cream of tartar

Preparation:
Preheat oven to 350 degrees.
In a food processor or mini max spin sugar until it is super fine. Sift half the sugar with the cake flour and the salt and set the mixture aside.
In a large bowl, use a balloon whisk (your biggest whisk) to thoroughly combine egg whites, vanilla extract, and cream of tartar. After 2 minutes switch to a hand mixer. Slowly sift in the reserved sugar, beating continuously at medium speed. Do not beat at high speed as you will create bubbles which mar the texture of this fine cake. Once you have achieved medium peaks, sift enough of the flour mixture in to dust the top of the foam. Using a spatula fold in gently. Continue dusting and folding until all of the flour mixture is incorporated.
The term folding means gently stirring the mixture by starting at one side of your bowl and running your spatuala (I use a rubber spatula) in a circular, swooping motion around the bowl, rolling and folding until all ingredients are incorporated. Just use a gentle touch and you won't go wrong.
Carefully soon the mixture into an ungreased tube pan.  Bake for 35 minutes before checking for doneness with a wooden skewer.

Cool upside down on a cooking rack for at least an hour before removing from pan.
And here is the finished product topped with homemade vanilla ice cream,
strawberries and hot chocolate sauce.

BIRTHDAY MARTINI
TO GO WITH THE BIRTHDAY CAKE!

Several years ago my brother, Skip gave me this special hand-painted martini glass for my birthday. Lolita (www.designsbylolita.com) makes glasses for all occasions in different styles--wine, champagne, etc. I cherish my birthday glass and use it just once a year...on my birthday! Each glass comes with its own recipe printed on the bottom. When I first tried this drink I truly believed I was drinking birthday cake. It is refreshingly wonderful and very celebratory!
HAPPY BIRTHDAY-TINI
1 oz. vanilla vodka
1 oz. triple sec
Pineapple Juice
Cherry Juice
Shake over ice; strain and pour.
Yum! Yum!

Now that you've had your cake, let's go back to dinner...I recently made a very simple and delicious chicken, wine and mushroom dish. This is another of those do-ahead recipes so you can get it all put together and kitchen cleaned up before the guests arrive.
CHICKEN, WINE AND MUSHROOMS
Here are all the ingredients you need.

Ingredients:
4 chicken breast halves with skin and bone
White flour for dredging
Salt/Pepper
1/4 cup olive oil
2/3 cup chopped onion (I used shallot.)
1/3 cup chopped carrot
1/3 cup chopped celery
2 Tbsp. chopped parsley
2 large cloves garlic, chopped
1 pound mushrooms (I used about 3/4 pd. baby portabellas, sliced and a pkg. of Bunashimeji, pulled apart-see above left in photo. Bunashimeji are a beech mushroom, grown in clusters with very tender tops; flavor is rich and nutty. I love them!)
1 14 1/2 to 15 oz. can diced tomatoes in their juice
1 cup dry white wine
I happened to have a cup left of Indaba, a South African wine that is light and aromatic. Indaba is the traditional Zulu forum for sharing ideas. I bought this wine because I liked the name and I generally like wines from South Africa. Here is some of what the wine maker has to say about this superb and reasonably priced wine (around $10/bottle):
Bright tropical fruit aromas lead to a crisp, fresh palate with mouth-filling flavors of apple, pear, honey and pineapple. A gentle kiss of oak adds a creamy butterscotch nuance and a wonderful depth.
Now, back to the recipe...

Preparation:
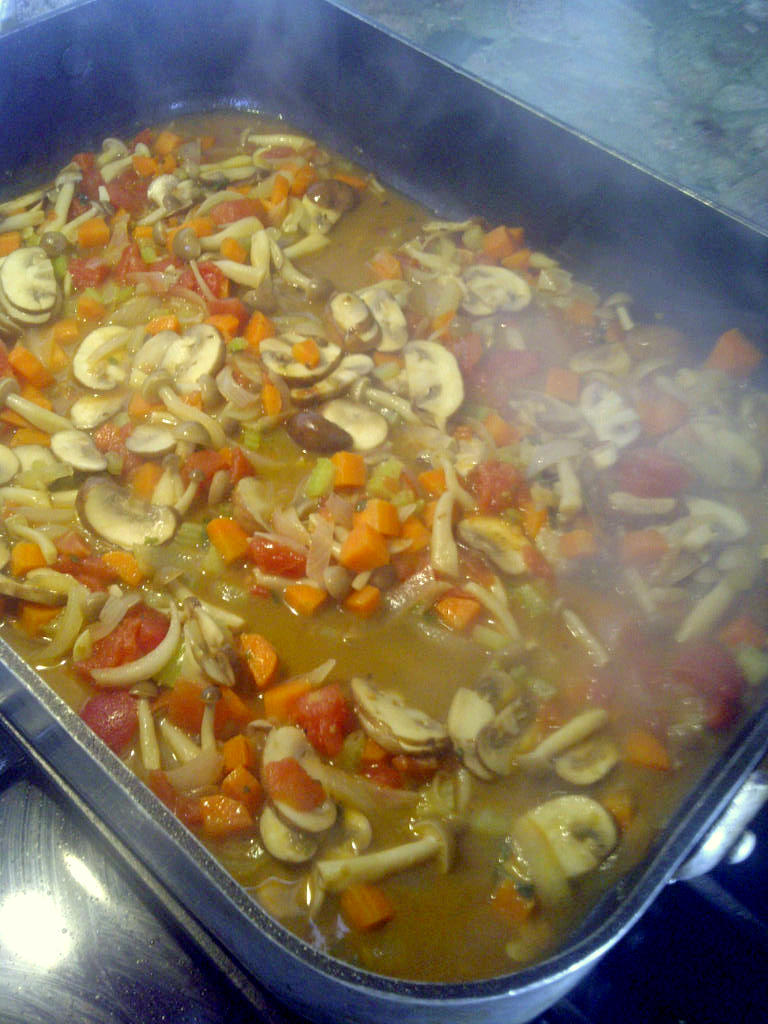
My chicken breasts were so large that I cut each half breast in half again. Sprinkle chicken with salt and pepper. Dust thoroughly with flour. Heat oil in a heavy large skillet (I used my large roasting pan.) over medium high heat. Add chicken, skin side down, and saute until brown, about 5 minutes. This will make a mess so if you use a splatter guard that helps.
Turn chicken over and saute 3 additional minutes. Transfer chicken to a bowl. Add onion (or shallot), carrot, celery, parsley and garlic to skillet; saute a couple minutes. Add mushrooms and saute until everything starts to brown--about 10 minutes.

Add tomatoes with juices and wine. Boil sauce gently until slightly thickened--about 10 more minutes. Return chicken to sauce. This is where you may stop the dish. Cover and put in the fridge until ready to finish cooking. If you do this, let the chicken sit on the counter about a half hour before you place in the preheated oven to finish cooking for about 45 to 50 minutes. Transfer chicken and sauce to plates and serve.

I am going to conclude with another cocktail. I first learned about this cocktail years ago in Gourmet Magazine and then recently again from a good friend of my brother's. Thanks Willis!
ELDERFLOWER MARTINI
Elderflower liquer is made from the flower of the elderberry, which is supposed to be effective for curing everything from colds and flu to diabetes and even constipation. I figure with an herb this powerful it has got to be great for you to drink. The elderflower liquer on its own is a bit sweet, but mixed with vodka it becomes an exotic, extremely floral and exhilarating martini.
Mix 1 part elderflower liquer with 2 parts of your favorite vodka. Shake over ice. Strain and pour into a martini glass.

And that will conclude another episode of:
 
Have FUN in the kitchen.
Play with recipes to make them your own.
Share your cooking experience with friends and family.  
Make many happy, joyous moments and memories
in your kitchen.
 
Here's a crazy shot of me getting ready to butcher a pig.