Showing posts sorted by relevance for query do ahead rolls. Sort by date Show all posts

Saturday, November 23, 2013

Thanksgiving Tidings...

We just got back from the Thanksgiving Day Parade here in Plymouth. This is the second largest Thanksgiving parade in the country, after the Macy's Parade and this year it was truly spectacular! It has everything you want to see in a parade: marching bands, drum and bugle corps, horses of all kinds, old cars, floats, those big huge balloons that take several people to hold down and of course, Santa riding in to conclude the parade.
But before we get into Christmas I want to share my Thanksgiving Day menu and give you a couple "do-ahead" tips. I made two cranberry relishes last week; one is a repeat from last year--back by popular demand, Ginger Cranberry and the other is a fairly standard Cranberry Orange relish with the addition of pineapple. These sauces keep well for a week or more in the fridge making them a quick and easy do-ahead for your big dinner. And so much better than the stuff from the store.

You can find the Ginger recipe from my November 30, 2012 blog. The freshly grated ginger root gives the cranberry a nice kick. Here's the recipe for the new sauce:

CRANBERRY ORANGE PINEAPPLE SAUCE

The Ginger Cranberry is on the left and the Orange Pineapple on the right.
They look nearly identical, but taste very different!
Ingredients:
3 cups fresh cranberries (1 12 oz. bag)
1 cup sugar
1/2 cup freshly squeezed orange juice
Peel and cut the other half into small pieces; remove any white membrane
Zest from the whole orange
8 oz. can crushed or chunk pineapple in its own juices (not sweetened). I used crushed so the pineapple itself disappeared, but left a nice pineapple flavor.
1 cup water

Preparation:
Bring all ingredients to a boil over moderate heat stirring occasionally. Reduce heat and simmer, uncovered stirring occasionally until slightly thickened, about 20 minutes. Sauce will continue to thicken as it cools. Cool completely and then store in tightly covered glass container in the refrigerator.

Here is the complete Thanksgiving Day menu. You will find some of these recipes on last year's November 2012 blog.

Hors D'oeuvres will be handled by my brother Skip and his wife Esther, and his son Chris and wife Sarah who are also joining us at my Dad's this year with their adorable 2 year old baby, Peregrine.

*TURKEY ROULADE WITH CLASSIC STUFFING AND RICH BROWN GRAVY
*HAM WITH CLOVE STUDDED ORANGES AND MAPLE SYRUP
*BRINED HERB-CRUSTED TURKEY WITH SAUSAGE STUFFING AND APPLE CIDER GRAVY

*TWICE BAKED SWEET POTATOES WITH PECAN, CINNAMON, BUTTER AND BROWN  SUGAR TOPPING
*BOURSIN CREAMED SPINACH
*STEAMED PEAS AND PEARL ONIONS

*BAKED ROLLS
*SPICY CRANBERRY GINGER RELISH
*CRANBERRY ORANGE-PINEAPPLE SAUCE

*PUMPKIN CHEESECAKE WITH GINGER SNAP CRUST
*PUMPKIN ICECREAM

Esther is also bringing an apple pie and who knows what other goodies will show up on the harvest table!

Today I also want to talk about a do-ahead gravy that I made last week. It may be the best gravy I ever made and takes all the last minute frantic effort out of doing gravy when everyone is ready to sit down and eat. This gravy can be frozen for a couple weeks. I took this photo after freezing the gravy.


Here's another trick which you may want to try. I just learned about it. Cook white flour before using in a brown gravy or rich stew. It darkens the color and I believe removes any of that 'floury' taste that sometimes occurs. All you do is heat a dry, clean skillet over medium heat. Add 2 cups white flour and stir frequently with a wooden spoon or heat-proof spatula. Just as the flour begins to darken stir constantly. I stirred for 20 minutes and said "enough!", but the technique I read about said to stir for 50-60 minutes. The stirring is important as the flour can burn fairly easily which stirring avoids. This is how the flour looked before and after:


You can store the cooked flour for up to a year in the freezer.
DO-AHEAD RICH BROWN GRAVY
Ingredients:
1 large onion, chopped
2 carrots, chopped
2 stalks celery, chopped
1 Tbsp. olive oil/1 Tbsp. melted butter
Turkey parts-I used 2 large legs cut up by the butcher into 2" rounds. Necks or wings would also work well.
2 Tbsp. cold water
8 cups chicken or turkey stock
2 cups water
4 sprigs fresh thyme
1 large sage leaf
2 cloves garlic
3 Tbsp. butter
1/2 cup browned (or white) flour
Salt/Pepper to taste
Pinch of cayenne

Preparation:
Preheat oven to 400 degrees. Combine onion, carrots, celery, olive oil, 1 Tbsp. melted butter in a large roasting pan and toss to coat. Place the turkey parts on top of veg. Liberally add salt/pepper. Put the roasting pan in the preheated oven and cook until the turkey wings are browned and vegetables are caramelized and softened, 40-45 minutes.
Transfer turkey and veg to a large stockpot. Place the roasting pan over a stovetop burner on medium heat. Pour 2 Tbsp. cold water into the pan and bring to a boil, scraping up all browned bits. Transfer mixture to the stockpot and add 8 cups chicken or turkey stock and 2 cups water, thyme, sage leaf, garlic. Bring to a boil. Reduce heat to low and simmer, uncovered until meat falls off the bone, about 3 hours. Skim off turkey fat throughout the process and set aside 2 Tablespoons.
Strain turkey stock through a fine mesh strainer and reserve 6 cups of stock. When I made this, 6 cups was all that was left after it bubbled on the stove for 3 hours.
Heat 3 Tbsp. butter and 2 Tbsp. reserved turkey fat in a large saucepan over medium heat. Sprinkle in flour and cook, whisking continuously until it begins to thicken, 3-4 minutes. Simmer until desired thickness. Season with salt, pepper and a pinch of cayenne to taste.

On turkey-day I will scrape some of the turkey pan drippings into the pre-made gravy to give it a little more richness as it reheats. This recipe sounds like a lot of steps, but it is VERY easy and makes a perfect gravy. Next time I think I might try adding 1/2 cup dry vermouth or white wine or possibly some shitake mushrooms.

Yum! Yum!
Here are a couple more photos from today's parade...

Playing the fife while riding these crazy bicycles looks like no easy feat!


Preparing a big Thanksgiving dinner does not have to be stressful. By doing a few things ahead of time it takes a lot of the work out. Tomorrow I am going to share with you the recipe for the turkey I am making this year. It's one from Anne Burrell using some different techniques, but much of the work is done ahead.

I am incredibly grateful for the beautiful day I spent with my husband, cousins Joe and Kathe and tens of thousands of other people all feeling the spirit of this tremendous season. There was lots of love in the air.


Thanks, as always for sharing with me!
 

Monday, November 20, 2017

Happy Thanksgiving!

THANKSGIVING MENU 2017

This is going to be a different Thanksgiving for my husband, Jerry and me. In September I was diagnosed with breast cancer and tomorrow (2 days before Thanksgiving) am having my third surgery. As odd as it may sound, I feel happy, strong and very confident that this will soon be behind me, but in the meantime was not sure I would be up to cooking my usual big holiday feast. So I have prepared the entire meal in advance, freezing almost everything except the turkey, which my husband will cook Thanksgiving morning. Here is our menu:

Cranberry Orange Sauce with Fresh Ginger Root
Don't you want to just dive into that sauce?!?
I made this several days ago. It keeps well in the fridge for up to 2 weeks. I make a variation of it every year. Go to: http://cookwithcindy.blogspot.com/search?q=cranberry+sauce for the original recipe. This year I used half the sugar and all freshly squeezed orange juice for the liquid.
Homemade Dinner Rolls

(Go to: http://cookwithcindy.blogspot.com/search?q=do+ahead+rolls and scroll nearly to the bottom to get this recipe. I make them every year because they freeze well and that is one less thing to prepare as the big day approaches.

Green Bean Casserole with Cauliflower Cream
 

This is a take on the old fashioned (and pretty horrible) Canned green bean casserole with canned mushrooms and canned shoestring onions on top. This one looks a little better and was fairly easy to put together. The cauliflower cream is really delicious! You still have time to do this before Thursday. Recipe follows.

Triple Onion Mashed Potatoes

I believe this will freeze well, but have never tried so we will see! The addition of sautéed leeks looked wonderful and topping with crispy shallots and chives put this plain mashed potato recipe over the top. The recipe follows.

Roast Turkey Stuffed with
Pear/Sage and Golden Raisin Stuffing
 
This was my Nanna's roasting pan. It has seen many a turkey!
The Pear/Sage Stuffing has complex flavors and will only intensify when cooked in the bird on Thanksgiving morning. I know most caution about roasting your bird stuffed, but I have been eating turkey that way since a child and cooking it that way all my life, as has my Mom long before I was born so I will keep that tradition alive! Stuffing recipe follows.

And finally, my "DO-AHEAD GRAVY" will also be on our Thanksgiving table. Here is the link: http://cookwithcindy.blogspot.com/search?q=do+ahead+gravy You will love this gravy recipe. So silky with rich, deep flavors.

This is a winner. I do not like making gravy day of the holiday. Everyone is anxious to sit down and you are still toiling in the kitchen trying to get lumps out. This takes all the tension out of making gravy.
These are the turkey legs I used to make this year's gravy.
Looks like something you'd see on the Flintstones sideboard.
Green Bean Casserole with Cauliflower Cream

Ingredients:
1 cup chopped yellow onion (I used white.)
1/4 cup olive oil, divided
7/8 tsp. Kosher salt (I used 1 tsp. by measuring in the palm of my hand.)
3/4 tsp. black pepper, divided
1 lb. green  beans, cut into 2 inch pieces
12 oz. shitake mushrooms, stemmed and halved
1 8 oz. container cremini mushrooms, stemmed and halved
3 cups chopped cauliflower, about 9 oz.
1 1/2 cups 2% milk (I used 1 cup 2% milk and 1/2 cup half and half.)
2 dried bay leaves
2 thyme springs (My thyme is done for the year so used 1/2 tsp. dried.)
2 garlic cloves, crushed
1 Tbsp. sherry (I used 2.)
1/8 tsp. ground nutmeg
Cooking spray
3 oz. whole wheat bread crumbs (about 2 slices or 2 1/2 cups.)
Here are the roasted onion, mushrooms, and green beans.
Preparation:
Preheat oven to 425 degrees. Combine onion, 2 Tbsp. oil, 1/2 tsp. salt, 1/4 tsp. pepper, green beans, and mushrooms on a foil-lined baking sheet. Bake at 425 degrees for about 15-20 minutes.
Bring cauliflower and next 5 ingredients (through garlic) to a simmer in a saucepan over medium heat; cook 25 minutes or until tender. Remove pan from heat. Let cool slightly. Carefully place cauliflower mixture in blender; blend until very smooth. Return puree to pan; stir in remaining 1/2 tsp. salt, remaining 1/2 tsp. pepper, and sherry and nutmeg. Place green been mixture in a 9x9 inch baking dish coated with cooking spray; top with bread crumbs that have been mixed with 2+Tbsp. oil. Sprinkle over dish. At this point, I froze, and will thaw completely before baking for 10 minutes at 425 degrees.

Triple Onion Mashed Potatoes
Ingredients:
1 1/2 lbs. Yukon Gold potatoes, peeled and cubed
1/2 cup chicken stock
1/4 cup half and half
1 1/2 oz. cream cheese, softened and cut into pieces
3/4 tsp. Kosher salt
1/4 tsp. black pepper
1 1/2 Tbsp. unsalted butter (I used 2 1/2.)
1 cup chopped leeks
1 1/2 Tbsp. canola oil (I used olive oil.)
1/2 cup sliced shallots
1 Tbsp. chopped fresh chives

Preparation:
Bring potatoes to a boil in a large Dutch oven or saucepan filled with water. Reduce heat to medium; simmer 20 minutes or until tender. Drain; return potatoes to pan. Add chicken stock, half and half, cream cheese, salt, pepper. Mash to desired consistency.
Melt butter in a skillet over medium-high heat. Add leeks; saute 5 minutes. Stir leek mixture into potato mixture. Do not wipe out skillet.
At this point I froze the potatoes and will finish the crispy shallots and chives on Thanksgiving morning, but if you are making on the spot...return skillet to medium-high. Add oil and shallots; cook 3 minutes or until shallots are browned and crisp. Spoon mashed potatoes into a serving dish and top with crispy shallots and chives.

Pear/Sage and Golden Raisin Stuffing

This is a recipe from Cooking Light, which I have changed up a bit, so not quite so light.

Ingredients:
1 loaf homemade or bakery style white bread, sliced and cut into 3/4 inch cubes
1/2 cup golden raisins
1/4 cup hot water
2 thick-cut bacon slices
2 cups onion
1 cup chopped celery
2 Tbsp. Bell's seasoning
3 Tbsp. fresh sage, chopped
1 Tbsp. minced garlic
1 1/2 cups chicken stock
5 Tbsp. butter, melted
1/2 tsp. black pepper
2 large eggs
1 1/2 cups chopped ripe Bosc pear (about 2 large)
Cooking Spray

Preparation:
Preheat oven to 400 degrees. Toss bread cubes in various herbs and spices: finely diced fresh rosemary, fresh sage, Bell's seasoning, garlic powder, onion powder, Salt. Arrange bread cubes in single layer on a rimmed baking sheet. Bake at 400 for 20 minutes or until golden, stirring after 10 minutes. Place bread cubes in a large bowl. Reduce oven  temp to 350 degrees.
Place raisins in 1/4 cup hot water to plump. Let stand 10 minutes. Drain.
Cook bacon slices in a skillet over medium heat until crispy; about 10 minutes. Remove to paper towel-lined plate; crumble. Add 1 Tbsp. butter to bacon drippings, onion, celery and saute for 8 minutes. Add 1 Tbsp. sage and garlic; cook 1 minute more. Remove pan from heat.
Combine stock, butter, pepper, and eggs in a large bowl. Add stock mixture, drained raisins, bacon, pear, and veg mixture to bread. Toss to combine. At this point I froze and will thaw completely before stuffing the bird. You may also coat a 2 quart baking dish with cooking spray and bake at 350 degrees for 25 minutes, if you do not want to stuff it in the bird. If you cook it separately it should be called Un-Stuffing.


I have so much to be grateful for and even though currently experiencing cancer, believe that cancer can provide many gifts--
The outpouring of love from friends and  family has been overwhelming. The love and devotion from my husband has served to strengthen our wonderful relationship. And I truly feel this has brought me closer to God.

HAPPY THANKSGIVING
FROM MY KITCHEN TO YOURS!
My husband, Jerry and I, celebrating his birthday
at Hacienda del Sol in Tucson. Fabulous, elegant, and understated Ranch.
November 13, 2017


Sunday, November 18, 2012

Thoughts of Gratitude...

I have missed you! And I have truly missed talking about food. Our trip to Eastern Europe included stays in Berlin, Germany; Warsaw, Krakow and Zakapone, Poland; Slovakia; Prague and Pilsen, Czech Republic; Budapest (my Mom's family's original home--my granparents are both from there), Hungary; and Vienna, Austria. Phew! Lots of new and different taste treats, but NO cooking. I thought there would be an opportunity in Budapest, but the cooking class was canceled due to lack of interest...I can assure you not on my part!

Me and Jerry in Zakapone which is high in the Tatra mountains!
One of the highlights of this fabulous journey was dinner in a Polish family's private home. The mother did the cooking, which involved many courses, shots of Polish vodka-Nostrovia!--and even some home-made lemon liquor that tasted a bit like limoncello. It was a night to remember and in a future blog I will share some food details of this dinner and other meals that I thoroughly enjoyed.

The focus of this trip was WWII history.  What an eye-opener. I had no idea that the Poles suffered so severely during this horrible time in history. The Poles we met were exceptionally warm, loving, bright and open to sharing themselves and their history--past and present. Our adventure also included music (even heard the Vienna Boys Choir!), folk dancing, architecture, and of course lots of eating!  Jerry and I have been waiting to take this trip for 20 years and every aspect pleased, surprised, entertained and amused us. What a wonderful experience. I am so grateful to have had the opportunity!

After 3 weeks away, we returned to our home in Massachusetts and the next afternoon had company arrive from Ireland to spend the week with us. Our friends, Barbara and Tim who look after our house in Spiddal joined us for a week of touring right here in America's home-town, Plymouth. Great visit and we were delighted to treat them as they do so much for us.

One week later we were on a plane again to Ireland with my 2 sons. This was the first time we had traveled together as adults. Another spectacular trip and this time I was able to do lots of cooking as we stayed in our own guest house overlooking Galway Bay.

Unfortunately my Dad became quite ill while we were away. We got back as quickly as possible and have been looking after him the last few weeks. I am grateful for the time we share together and so pleased that his sense of humor remains intact and we are able to have many happy times together.

This explains why I have not been in touch with you for so long. Thanksgiving is next week and provides us with the opportunity to pause from our busy lives and give thanks for all we have; to count our blessings and be happy for the love and joy of friends and family. Now, on to some food...!

OH NO, NOT SQUIRREL AGAIN!
I have had lots of game lately.  My Dad's neighbor shot a moose this year so we have feasted on both moose burger and moose steaks. Another friend got a deer and I made a fabulous venison stew; rich and delicious. Dad recently gave me a squirrel and I thought I would try something different. I talked about squirrel a few blogs back, but this dish was one of the best squirrel feeds I have ever had so I want to share it with you. If you don't have squirrel I think it would be equally good with rabbit or even chicken thighs.
Even though the meat is dark, squirrel is quite mild.
SQUIRREL CASSOULET
Cassoulet is the French word for casserole and makes the meal sound much more elegant.  Cassoulets originated in the south of France and usually contain meat-pork, goose, or duck, but as luck would have it, I had a fresh squirrel so decided to use it. I had prepared lentils with a rich tomato sauce the day before so it made this dish really easy to put together. This serves 2 people.

Ingredients:
1 squirrel, or rabbit, or 4 chicken thighs (skin and bone in)
1 stalk celery, chopped
2 carrots, thickly sliced
1 small onion, sliced in wedges
6-7 cloves garlic
Salt/Pepper
3 Tbsp. Olive Oil
1/2 cup red wine (I used Merlot)
1/2 cup water

1/2 cup dried lentils (I used Gonsalves brown lentils.)
15 ounce can whole tomatoes with their juice
1/2 cup onion, sliced
1 cup green cabbage, sliced in fairly thin wedges
2 Tbsp. Olive Oil
Salt/Pepper
1/4 tsp. dried oregano
1/4 tsp. dried gound bay

If you want to make this in stages as I did, begin by cooking the lentils. I had actually made the lentils for our lunch the day before and had leftovers.
Preparation for lentils:
Brown the onion, cabbage in a large pot in the olive oil over medium/high heat. Add salt/pepper and dried herbs. Add 1/2 cup dried lentils. Stir thoroughly so lentils get coated with olive oil. Once the veg is nice and browned, add the can of whole tomatoes and break them apart using a spoon or rubber spatula. Cover and let simmer for about 45 minutes or until lentils are tender.

Back to the Squirrel Cassoulet...
Liberally salt and pepper your squirrel. In a large saucepan over medium/high heat, add 3 Tbsp. Olive Oil, carrots, celery, onion, and garlic. Add the squirrel and stir all together so everything gets coated with oil. Cook for about 30 minutes stirring from time to time so it doesn't burn. Once this mixture is very browned (squirrel will not be done at this point), add 1/2 (+) cup (I didn't measure, but it looked like a half cup) red wine and 1/2 cup water.

Cover and simmer for another 45 minutes. The liquid will reduce by about 1/2. Let cool and tear the meat off the bones.

Add the lentil/tomato/cabbage mixure and stir together in your favorite cassoulet dish. Cover and bake at 350 degrees for 35-45 minutes. I guarantee you will not be disappointed with this dish!

Back in August, before the back-to-back extravaganzas began, I was doing some experimenting with unflavored gelatin. I promised I would tell you about...

TOMATO ASPIC
Even though we are now well into fall and cooler weather Tomato Aspic still makes a nice light lunch served with a green salad and whole grain rolls. This recipe is easy to make and is not something you see served much anymore. Aspics were very popular in the 1950's ad 60's. Here is the plain, straight-forward recipe, but do not be timid about experimenting! I served mine with green salad dressed with citrus vinaigrette and wild shrimp.

Ingredients:
3 envelopes Knox unflavored gelatin
2 cups cold tomato juice
2 1/2 cups tomato juice heated to a boil
6 Tbsp. fresh lemon juice
1 1/2 tsp. Worchestershire sauce
4-6 dashes hot pepper sauce

Are these ingredients sounding familiar? Adding a shot or two of vodka might be fun to try for an adult only aspic!
                                                                                    Preparation:
In a large bowl, sprinkle unflavored gelatin over cold tomato juice. Let stand 1 minute. Add hot juice and stir until gelatin is completely dissolved; about 5 minutes. Stir in remaining ingredients. Pour into a 5 qt. ring mold (I used my steamed pudding mold, but any vessel will work--even a metal bowl.) and chill until firm. To serve, unmold by dipping the mold in a pan of hot water and flip onto a serving plate. You may have to coax your aspic out, but once you break the seal it will pop right out. You can also fill the center with veggies. Cut into wedges and serve.


I love beans and the following recipe is easy to make and very satisfying.

13 BEAN SOUP with VENISON SAUSAGE
There is a store in Chichester, NH called the Healthy Buffalo which sells all kinds of game and unusual meats from bison to wild boar to ostrich and more . They make their own venison sausage which are really spectaular. You can place orders online (www.healthybuffalo.com). The sausage I used for this soup was made with red wine and demi glace.

Ingredients:
15 oz. package 13 Bean Soup (I use Bob's Red Mill brand)
1 1/2-2 qts. rich chicken broth (I like to have chicken broth in the freezer at all times!)
Mire poix-2 carrots, 2 stalks celery, 1 small onion; dice all
4 venison sausage (or pork sausage)
Big handful cherry tomatoes
1/4 tsp. dried thyme, oregano

Preparation:
Rinse and pick over beans. The other day I found a small stone in a bag of beans so this step is really worth doing.  Cover beans with water and soak for a couple hours. Rinse and add beans and chicken stock to large soup pot and bring to boil. If you like a very thick soup use 1 1/2 qts. broth. Turn to simmer and cook beans for about 1-1 1/2 hours. Add veg and herbs and cook for another hour at a simmer until both beans and veg are tender. Slice the venison sausage on the diagonal and drop into the soup and cook for another 30 minutes or so. Also add a big handful of cherry tomatoes which will pop as they cook. Serve with crusty bread for a healthy lunch!

I want to share my Thanksgiving menu with you and also the do-ahead rolls I make every year. You know my philosophy for big holiday or hoo-doo dinners is to make as much as possible ahead of time. I also am a list-maker and actually assign times as to when I am going to make which item...it helps me stay organized.
 
THANKSGIVING DINNER 2012
Appetizers:
Scallops wrapped in Bacon
Clam Dip with Assorted Crackers
Triple cream Goat Brie with Sliced Green Apples
Rich Banana Bread

Main course:
Stuffed Rolled Turkey Breast with Traditional Herby Bread Stuffing
Whole brined Turkey Glazed with Bourbon Butter with Traditional Bread Stuffing
Gravy
Glazed Whole Carrots
Steamed Peas and Onions
Duchess style Whipped Potato with Smoked Gouda Cheese and Crumbled Bacon
Cranberry Ginger Root Chutney

Dessert:
Mincemeat Pie
Cranberry Gelatin with Mandarin Orange Slices
 
FLUFFY MAKE-AHEAD DINNER ROLLS
 

Ingredients:
3 Tbsp. unsalted butter, plus 2 Tbsp. for bowl and baking dish
1 1/2 cups whole milk (I used 1 cup sweetened Almond Milk and 1/2 cup Half & Half)
1/3 cup Honey (Did you know I used to keep bees and made my own honey?)
4 Tbsp. vegetable shortening (I used butter.)
5-6 1/2 cups all-purpose white flour
1 Tbsp. Rapid-rise Yeast
1 1/2 tsp. salt
1 large egg, plus 1 large egg with 1 Tbsp. water for brushing

Preparation:
Heat oven to 200 degrees. When oven reaches 200 shut oven off. Grease bowl with 1 Tbsp. butter and put bowl back in warm oven.

Line a 13x9 inch baking dish with foil overhanging edges of pan in all directions. Grease foil with 1 Tbsp. butter.

Place milk, honey, shortening (or 4 Tbsp. more butter) in a large measuring cup and microwave until milk is warm and butter melts--1 to 2 minutes.

Mix 4 1/2 cups flour, yeast, and salt in a large bowl. Slowly add milk (make sure it is not too hot or it will kill the yeast; should be just warm or tepid.)  The recipe calls for mixing this on slow in a standing mixer, but I don't have one so just use a hand mixer until the flour is combined with the milk/butter mixture. Add the egg and beat until it is mixed into the dough which should be smooth and elastic. Add another 1/2 cup flour and knead until dough is smooth and shiney--about 6-7 minutes. Roll the dough toward you and press firmly with the heal of your hand to knead the dough.

Add more flour if the dough is sticky. When the dough starts to feel silky you have kneaded enough. Knead the dough into a firm ball and place in the buttered bowl that has been sitting in the warmed oven. Roll the dough around so it gets covered with butter. Cover with a linen (not terry cloth) dish towel and place back in oven to rise for about an hour.

Punch down dough and press out into a rectangle that measures about 6 inches wide and 10 inches long. Cut the dough into 3 strips the long way and then cut each strip into 5 equal pieces making a total of 15 pieces of dough. Roll the dough into balls and place in the greased foil-lined baking dish.

Cover with the linen dish towel and place back in the oven to rise again for another hour.

Take rolls out of oven and heat oven to 375 degrees. Brush tops of rolls with 1 egg beaten with 1 Tbsp. of water. Bake for 25 minutes until tops are golden brown.

Cool in pan on a rack for 5 minutes then lift the rolls using the foil edges out of the pan and cool on a rack for an hour.

These rolls freeze well for up to a month. If you are freezing for that long peel the foil off the baked rolls and wrap them tightly in plastic wrap and then wrap the foil around them and freeze. If you are only freezing for a few days just wrap the rolls thoroughly in the foil and freeze.

To serve: Take rolls out of freezer for 2 hours to thaw. Heat oven to 325 degrees and re-heat rolls for about 1/2 hour.

HAPPY THANKSGIVING
FROM MY KITCHEN TO YOURS!
 
ENJOY THIS MOST WONDERFUL OF HOLIDAYS!

Tune in again soon for more food from Eastern Europe,
holiday ideas, stories, recipes and more.
Peppers at the food market in Budapest


Tuesday, September 10, 2013

BRACIOLE!

Braciole (pronounced Brajole) is my definition of Italian comfort food. This dish is not difficult to put together, but is a bit time consuming. It falls into my 'do-ahead' category which makes it perfect to prepare for a dinner party.
Ingredients:
Two .75 lb. flank steaks-flattened to about 1/2 to 3/4 inch thickness
Minced garlic, 4 cloves
Chopped fresh parsley, 2 Tbsp.
1/3 cup fresh basil, chiffonade
1 cup Parmesan, grated
6 silces sharp Provolone
1/3 cup pistachio nuts, coarsley chopped
2 tbsp. capers
6 thin slices Proscuitto
4 cups fresh baby spinach
Freshly ground black pepper
1/4 cup olive oil plus 2 Tbsp. to make a paste with stuffing ingredients


Sauce:
2 lb. crushed plum tomatoes (two 1 lb. cans)
8 cloves smashed and chopped garlic
Bouquet garni*--basil, parsley, oregano
Salt/Pepper
2 Tbsp. olive oil
Heat oil in a large pan or heavy skillet, toss in garlic and cook gently for a couple minutes. Do not brown the garlic. Add the 2 cans of plum tomatoes, bouquet garni, cover and let cook for about 2 hours. Taste and adjust seasoning with salt/pepper. This will make more sauce than you need, but is great left over!
* A bouquet garni is simply a bunch of fresh herbs either tied together or tied into a piece of cheesecloth. Imparts great flavor!
Preparation:
Open your flank steaks and place between sheets of plastic wrap. Pound with a rolling pin, meat pounder, frying pan or any heavy object until the steaks are about 1/2 to 3/4 inch even thickness.


In a bowl mix together the black pepper (I did not use any salt inside as there are quite a few salty ingredients already!), garlic, parsley, basil, pistachios (I have never used pistachios before in braciole, but couldn't find pine nuts. The pistachios were fantastic!), capers, Parmesan cheese. Add 2 Tbsp. olive oil to this mixture to bind the ingredients.  Place 3 slices of sharp Provolone on the inside of each steak.


Next, spread the mixture evenly then add 3 slices each of proscuitto and finish with a couple cups of fresh baby spinach in each steak. Put as much spinach as you can fit into your steak as it cooks down to almost nothing. Here's the only tricky part...rolling and tying. (If you go to the top left of this blog and put Boneless Leg of Lamb into the SEARCH FOR RECIPES box, you will be directed to a 'how-to' video I made last year for stuffing and rolling boneless leg of lamb. The technique is exactly the same. Or, even easier, click on this link: Cook with Cindy - Food, Fun, and more!: Boneless Leg Of Lamb!)
Starting from the long edge gently roll the steak stuffing the ingredients in as you go. Tie the steaks every couple of inches with kitchen string. I did sprinkle a little salt on the outside of the rolls. At this point you can cover and refrigerate until ready to brown. If you do refrigerate, take steaks out of the fridge for a half hour before browning. To brown: heat 1/4 cup olive oil in a large heavy skillet. Place the steak rolls into the hot oil and brown on all sides.


In the same pan, cover the rolls generously with your homemade red sauce. Cover the pan and braise on low heat (just so the sauce bubbles gently) for 2 1/2 hours or more. The longer the meat braises, the more tender it will be. When ready to serve, take the steaks out of the red sauce and let sit for about 10 minutes. Remove the kitchen string and cut the steak into thick slices. Spoon sauce over the slices and serve with lots of extra sauce on the side. I served our Braciole with ziti's with fresh garlic, basil, and Parmesan cheese. The sauce is good on everything!


BUON APPETITO!
Enjoy with a glass of your favorite red wine, crusty
Italian bread, a little green salad.
Life is so delicious!

Thanks to all of you who went to the Jauntaroo website and viewed and "liked" my video for the position of CHIEF WORLD EXPLORER! It's not too late if you haven't had a chance. The deadline is September 15th. Go to:


UNTIL NEXT TIME...CIN CIN!

Sunday, January 9, 2022

AND SO A NEW YEAR BEGINS...!

This Thanksgiving Jerry and I celebrated 28 years of marriage. We rented the most adorable 100+ year old cabin on the northwest side of Tucson. You can find it on AirBnB.

https://www.airbnb.com/rooms/33250035


I knew the kitchen would be small so had the Thanksgiving dinner prepared in advance. I made a fairly traditional dinner, but instead of a whole turkey, did a turkey breast roulade. I often make the boneless stuffed turkey breast along with the whole turkey. For the roulade recipe, go to:

http://cookwithcindy.blogspot.com/search?q=turkey+roulade

Scroll down to second post to find the roulade. On the way you will see my 'Do-Ahead' gravy, which I also made ahead and brought to the cabin.

Here's a shot of our whole meal...
Rolls are super-sized as I wanted to make
turkey sandwiches with cranberry and mayo next day.

For dessert we had Martha Stewart's mile-high apple pie and home made vanilla ice cream. I have made the pie for past Thanksgivings. The crust is a rich pate brisee and the recipe calls for 14 apples. It is always a hit! 

There are a million vanilla ice cream recipes out there, but this is the best I have found.

BEST, MOST CREAMY, AND DELICIOUS 
OLD FASHIONED VANILLA ICE CREAM
Here's the recipe: 
http://cookwithcindy.blogspot.com/search?q=apple+pie.
The crust came out even better this time; very flaky!

Even when it's just the two of us, Thanksgiving dinner sometimes gets hectic so I forgot to take a photo of the pie served with the ice cream, but trust me, this is the most perfect, old-fashioned rich vanilla ice cream; only using 5 ingredients.
This vanilla ice cream photo was nabbed from the web!

Ingredients:
4 egg yolks
1/2 cup sugar
1 cup whole milk
1 cup heavy cream
2 tsp. good quality vanilla extract

Preparation:
Add egg yolks and sugar to medium saucepan and whisk until a light yellow color and well combined. In another small saucepan, heat milk over medium heat until it just begins to simmer. Do not stir. Gradually add milk to egg and sugar mixture, stirring constantly so the egg does not cook. Return to heat until it reaches 165 degrees (or coats the back of a wooden spoon). Do not allow to boil. As soon as it reaches temperature, remove from the heat. Pour custard base into an airtight container and store in fridge a few hours or overnight. Once custard is chilled, stir in the heavy cream and vanilla extract and pour into your ice cream maker. Process according to manufacturers instructions. One quart in my Cuisinart takes between 20-30 minutes. 

Christmas was very low-key for us this year, but I did make a nice beef tenderloin, which was delicious. Simplest of preparations...liberal salt/pepper, tie, rub gently with olive oil. Pan sear in a hot heavy-bottomed (I prefer cast iron.) pan and finish in a 400 degree oven until internal temp is around 120 degrees. Let rest about 10 minutes. It will keep cooking. Slice into thick servings. I served with baked potato and steamed asparagus. I do like the look of a raw piece of beef, neatly tied and ready to cook!

New Year's was also very quiet. I made a seared double-thick, bone-in center pork chop, brined in maple syrup, salt, water for 8 hours, and then glazed with a maple gastrique while pan searing. This was served with a creamy, mushroom marsala sauce, mashed sweet potato and buttered asparagus.
The maple gastrique did play havoc with my cast iron pan, but it was worth it!

MAPLE GASTRIQUE

Ingredients:
1/4 cup maple syrup
3 Tbsp. Blood Orange glaze
1/4 tsp. Kosher salt
1/4 tsp. Roasted Garlic and Herb seasoning
Freshly ground black pepper.

In general the proportion of sweet to vinegar in a gastrique is about 2 parts sweet to 1 part vinegar, but adapt to your own taste. 


Preparation:
Heat all in a small saucepan over medium heat until the sauce begins to bubble. Stir constantly until desired thickness. It needs to be thin enough to brush on the chops while they are cooking.

The holidays this year were saddened by the death 
of my dear brother, Skip, who after a brief illness, 
passed away in mid-December. 

Skip shared my love of cooking and was an excellent cook. 
He spent hours researching recipes, was a fabulous gardener, 
loved to fish and had a generous and open spirit. 

He had a brilliant mind and quick wit.
As an educator, he devoted his life to helping others.

The love he and Esther shared was nothing short of amazing.

I will miss you dearly, brother...
A few years back in the Bahamas.


PAUL 'SKIP' FREDERICK ASBELL, JR.
JUNE 13, 1950 - DECEMBER 14, 2021

www.cookwithcindy.com


Friday, March 30, 2018

CLASSIC BEEF WELLINGTON!

I posted a Beef Wellington recipe a few years ago, (http://cookwithcindy.blogspot.com/search?q=beef+wellington) but in that recipe took a few shortcuts. This is the "real-deal" and I think one that Gordon Ramsey would approve of. You may think judging by the last few posts that all I cook is beef. Not true, but I try to post the more interesting recipes and lately those seem to involve beef.

CLASSIC BEEF WELLINGTON
This recipe does involve quite a few steps, but is not difficult and completely worth it!

Ingredients:
1 lb. beef tenderloin fillet
Salt/Pepper
Olive Oil for searing-about 2 Tbsp.
1 lb. mushrooms (I used baby portabellas and white buttons mixed.)
1 clove garlic, minced (for the duxelles)
2 Tbsp. shallots, minced (for the duxelles)
4 thin slices of Proscuitto
2 Tbsp. mustard (I used my favorite: Maille Dijon*.)
7 oz. puff pastry (I used frozen. Defrost completely before using.)
2 egg yolks, beaten

*The Maille brand originated in Marseilles, France in 1723. It was sold to the multi-national consumer goods company, Unilever in 2000, but I still love the mustard. Wish I could've tried it before it was sold and now mass produced.

Preparation:
Season fillets liberally with salt and pepper. Heat olive oil in a heavy-bottomed skillet until it is nearly smoking. Sear fillets on all sides until just browned.

Remove the fillet from the pan. Let cool and then brush all sides with the mustard.
TO PREPARE THE DUXELLES: Chop the mushrooms, add minced garlic and shallots and put them in a blender. I used my mini-max, which is a great chopper. Puree until the mixture becomes a paste. Add a dash of salt.

Heat a frying pan on medium high and add the mushroom mixture. Stir the mixture allowing the moisture to be released from the mushrooms.
This is what it looks like when it first goes in the pan.
 
And this is how the consistency changes once moisture begins to release.
When the moisture has been released from the mushrooms remove from the pan and set aside to cool.

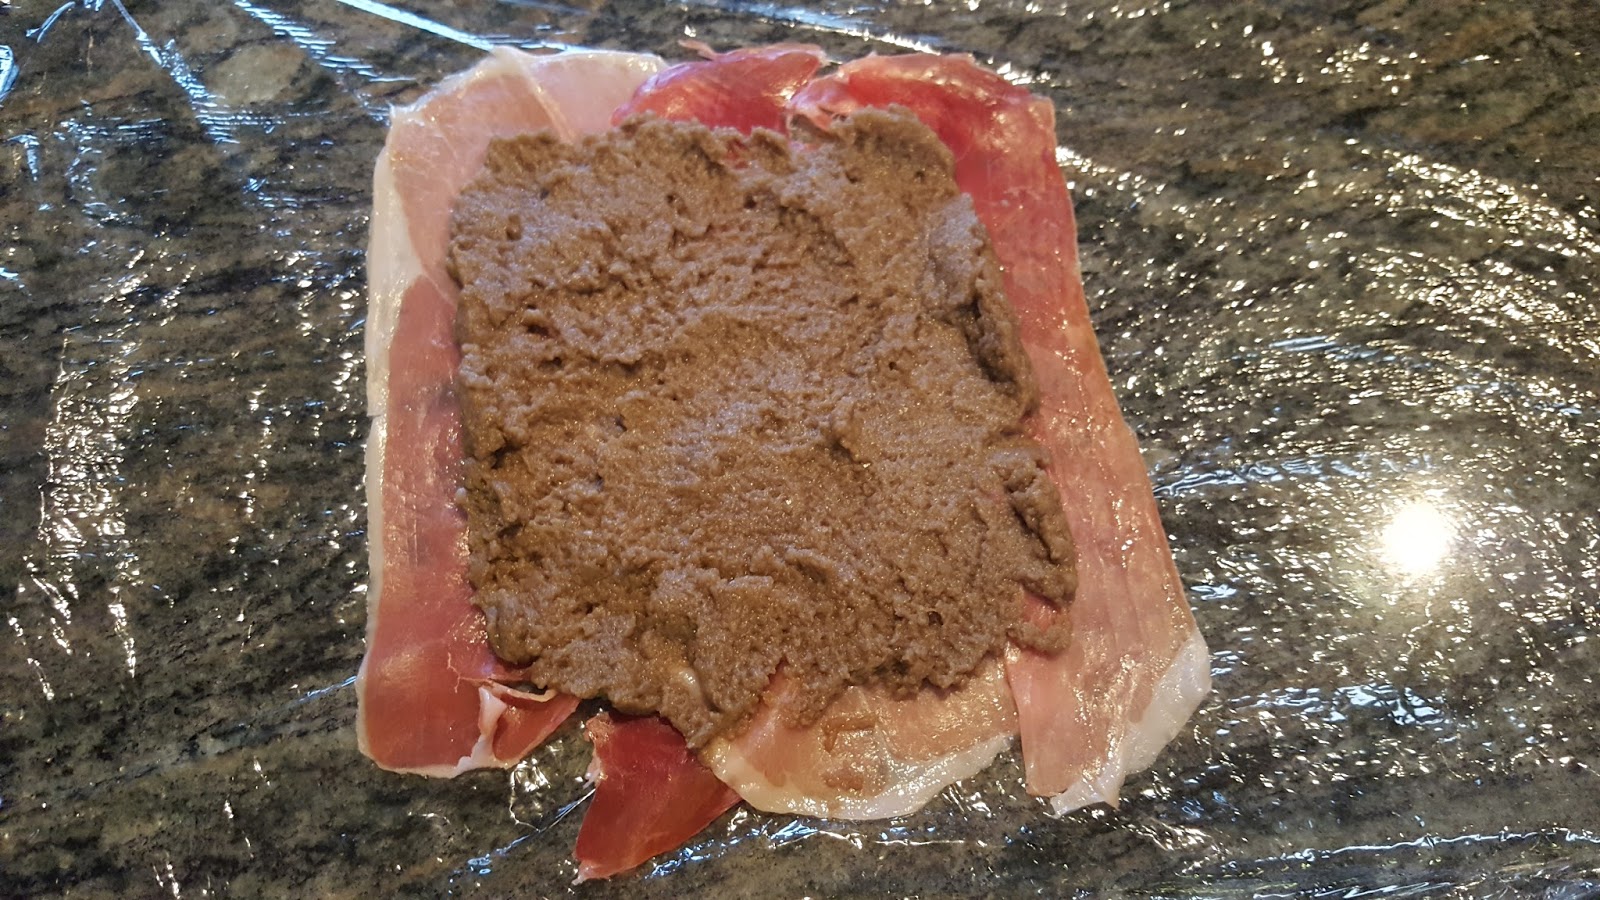
Lay out a large piece of plastic wrap. Place the prosciutto on the plastic wrap so the pieces overlap. Spread the mushroom duxelles on the prosciutto.

Place the beef in the middle, roll the prosciutto around the beef using the plastic wrap to create a tight barrel. Start by folding the 2 ends around the beef and then roll the longer pieces up and around. The plastic allows you to tighten your roll.
Even though this has been a few steps up to this point, now you can let this beef chill in the fridge for at least 20 minutes or for up to a few hours so this nearly qualifies as a "do-ahead" meal preparation.

When you're ready to bake, preheat oven to 400 degrees.

On a lightly floured surface roll out puff pastry to a size that will fit around each beef fillet. I erred on the side of way too much pastry as I didn't want to be short. Better to cut it to fit than not have enough pastry. Generously brush the pastry with the beaten egg yolks.

Unwrap the beef fillet and place in the middle of the puff pastry. Fold the pastry around the fillet trying to minimize overlapping pastry as that will not cook through. The pastry is quite forgiving and you can almost stretch it to make a completely sealed roll without much overlap. Cut away any excess pastry and avoid making pastry any more than 2 layers thick.

Place the pastry wrapped fillet on a baking sheet and cover with more egg yolk. Gently score the top of each fillet being careful not to go all the way through the pastry. Sprinkle the tops with course sea salt.

Now we're finally ready to bake. Place in the preheated oven for 25 to 30 minutes. Pastry should be golden brown and if using a meat thermometer it should read 125-130. I took mine out at 125 as both my husband and I like our beef on the rare side. Plus it does continue cooking even after removing from the oven.
Let rest for 10 minutes before slicing. I prefer to serve in 2 large pieces, but you can also  cut into 1inch thick slices.

All for today. This is Easter weekend and I want to wish each of you a happy, blessed and beautiful holiday. No cooking for me this year. I will be the happy guest of my good friends Francine and Jim Manspeaker.
I am simply bringing the rolls!
 
HAPPY EASTER!
 
MUCH LOVE!
 
Tune in again soon for another episode of:


Easter 2014 Jer and me preparing grilled coconut shrimp.